工作几年后做了一次人生重大的选择,终于有时间和精力来搞点业余的东西,就想到了曾经短暂玩过的博客。打开自己的github,看到托管在pages上的hexo博客上一篇还在遥远的2016年,还是不免有些感慨,时间过得真的好快。当时的自己无论如何也想不到再写下一篇博客的时候会是现在这样吧。不过先不想这么多,是时候恢复hexo博客,开启新的篇章了!
0x00 恢复原博客
0 尝试直接github同步
太久没弄了,早忘了该怎么操作,先把github中的代码库拉下来看看
git clone git@github.com:madgd/madgd.github.io.git
打开目录一看,发觉有点不太对。为什么只有html,没有md文件呢??
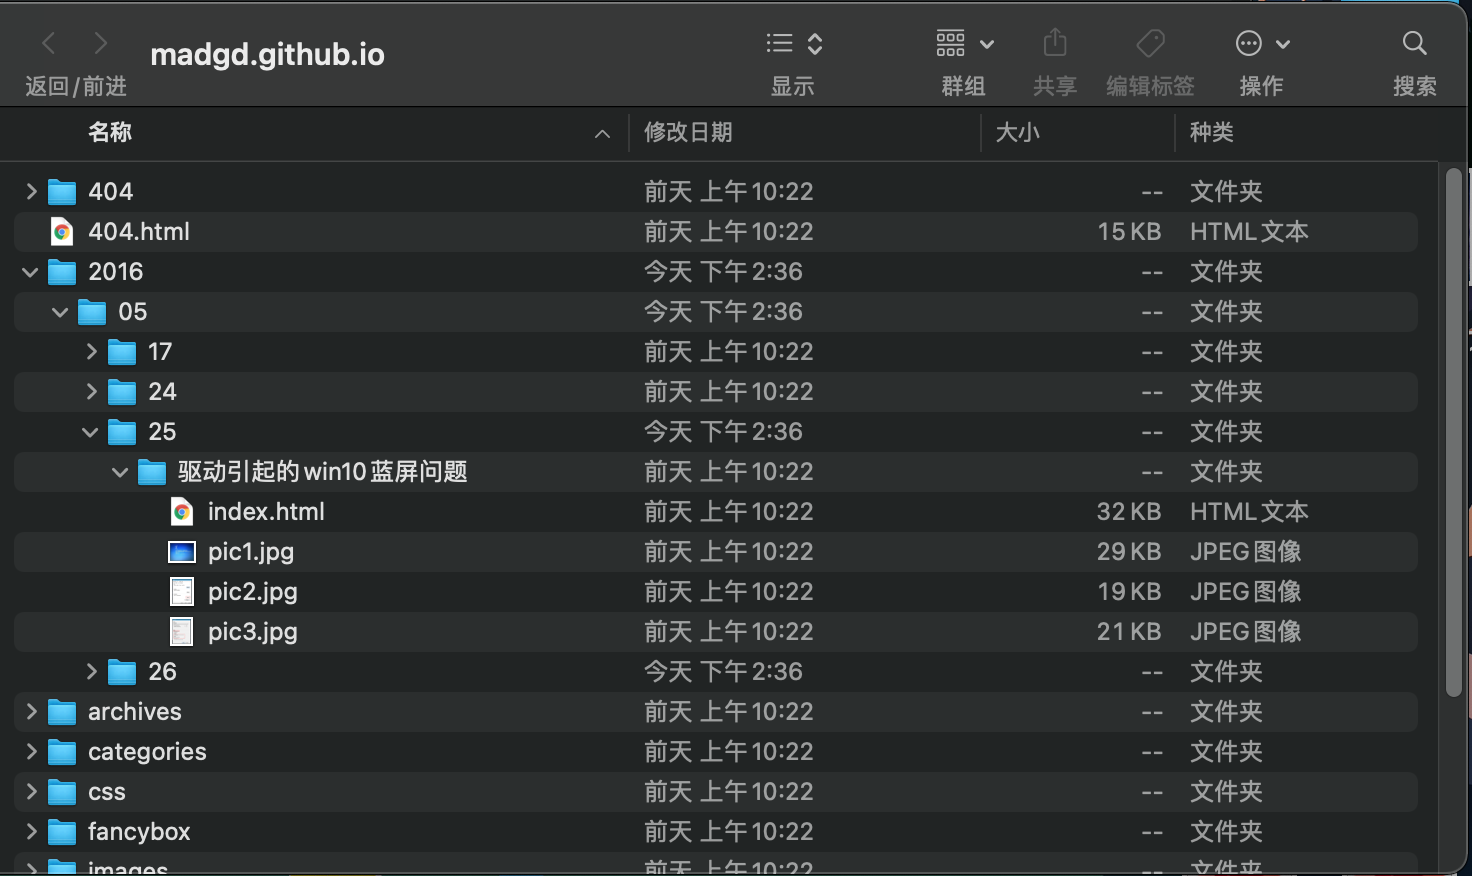
通过检索相关文档,才想起来md等数据是存在原始的hexo的工作目录中的,实际部署的博客目录是生成的public文件夹的结果。果断翻出旧硬盘找原始文件。但是只找到了若干md,并没用工作目录。
看来当年还是too young。
只能重新搭建hexo的工作目录,在把原来的md更新进去了。
1. 安装hexo
互联网上hexo的安装攻略一大把,随便搜一下照着来就行。
官方的文档有点旧了,谨慎参考:官方文档
参考这位老哥使用hexo搭建个人博客并部署到GitHub
windows环境可参考这位老哥 GitHub+Hexo 搭建个人网站详细教程
mac上比较简单:
1 | brew install node |
安装完成后验证:
1 | hexo s |
执行成功后访问http://localhost:4000可验证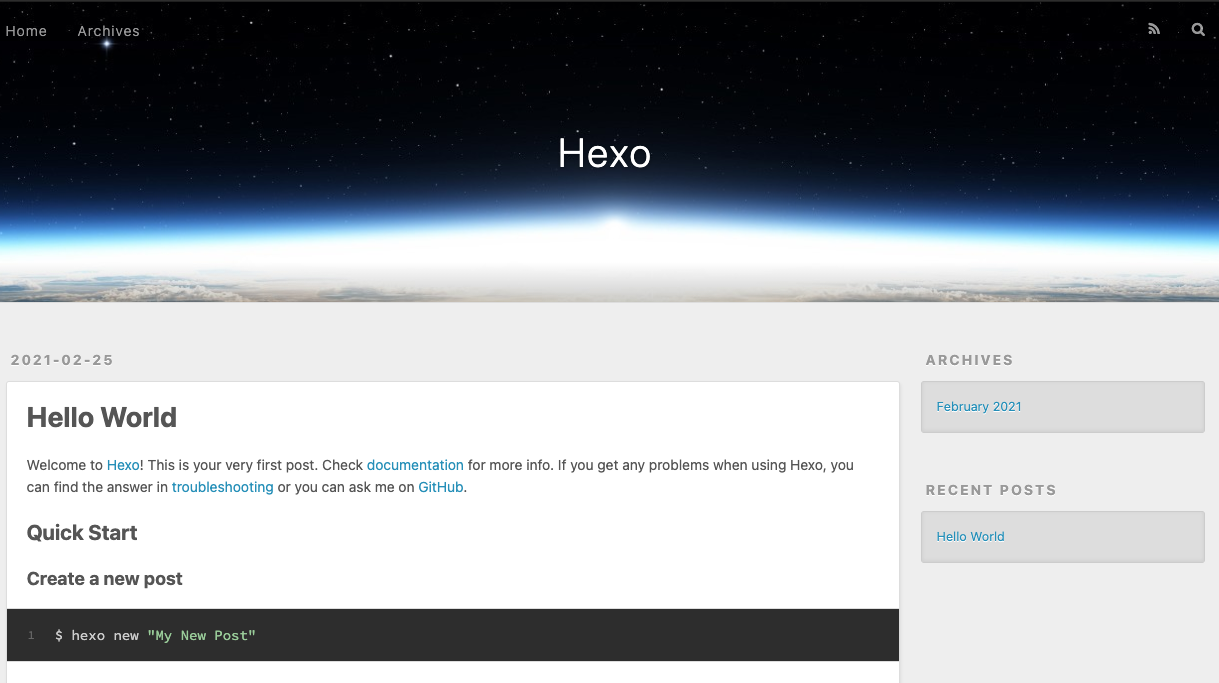
hints:
- npm速度慢——切换淘宝源
- 运行时,npm提示缺哪个包就
npm install就行了,有问题对症下药。
做一点站点的基础配置,编辑_config.yml:
1 | title: madgd's blog |
2. 安装next theme
hexo有大量主题资源,可以浏览并选择自己喜欢的主题安装theme
沿用原来使用的theme next
1 | cd blog |
编辑_config.yml
1 | theme: next |
在此hexo s 即可看到效果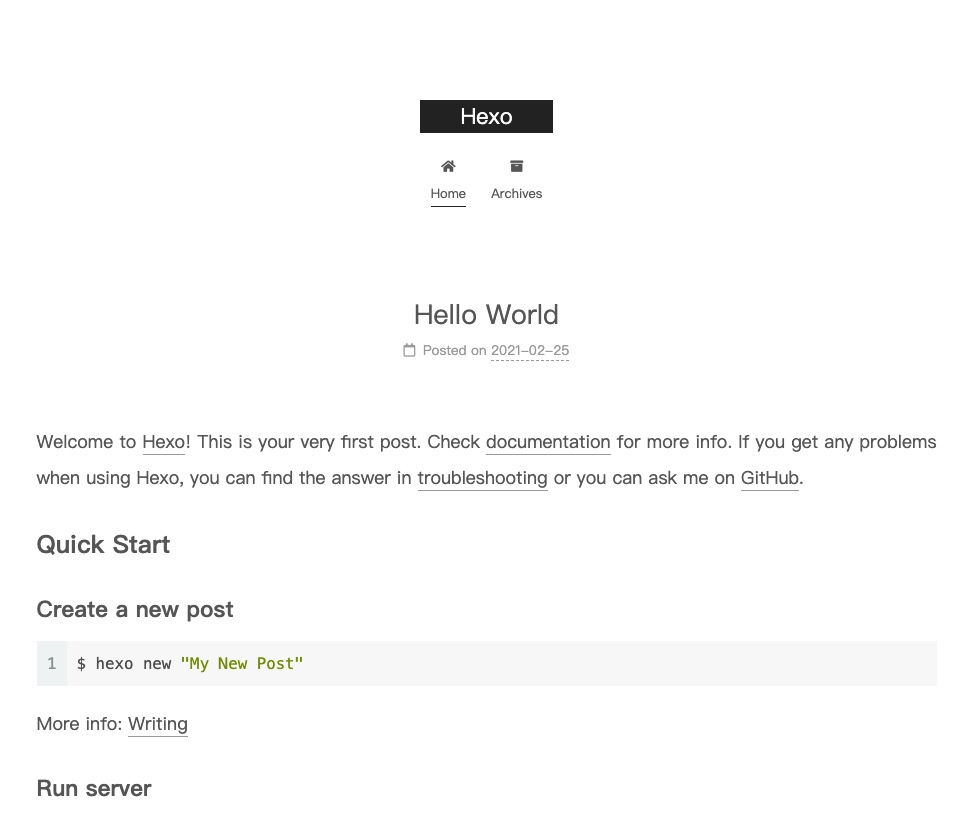
3. 恢复原post
将原有post的md移动到_posts文件夹中,发现标题,时间不对:
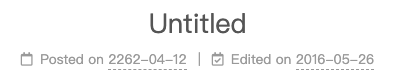
好解决,在md头部添加信息,即可修复标题、时间:
---
title: test
date: 2016-05-25 11:18:09
tags:
---
4. 统一图片路径
在source下建立img目录,将所有图片移入,修改图片链接为相对目录:
1 | 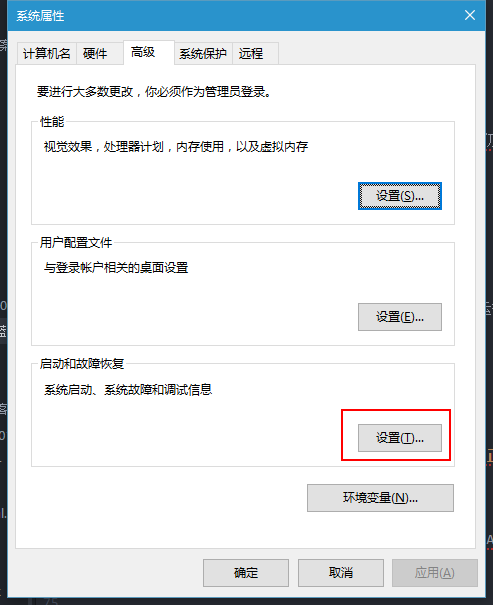 |
至此原博客工作目录恢复完成,可以开始编辑新的博文了
如何部署后文再讲
0x01 部署
官方介绍了多种一键部署方案, 这里我们使用github pages
0. 保留原代码
那么怎么保留hexo的原目录,以防在换电脑时避免文件丢失呢?
最好还是github代码库同步。但如果单独新建代码库,又略显多余。
一种主流方案是通过手动双branch实现:
branch master 作为默认分支,放生成的博客文件
branch source 用于保存hexo的工作目录原文件
参考文档:
另一种是官网推荐的用Travis CI持续集成的,我们只需要保持hexo工作目录在github上更新即可,继续集成将生成站点目录并推送部署。(其实也可以双分支)
1. 采坑解决
1.1 部署报错
在按照持续集成方案部署时,
1 | fsevents not accessible from chokidar |
检索该错误,未找到相关信息。检查travis 与本地环境diff,发现node版本不同:
1 | node_js: |
修改版本一致: - 15
并添加deploy目录:
1 | deploy: |
1.2 修复图片路径错误
通过相对路径法生成的博客图片,在博客首页显示正常,但在博文详情页,缺发生了链接错误的情况。是相对路径导致。已有的主流解决方法参考:
几种方法或者需要舍弃md在本地图片的显示,或者需要为每篇博文单独建立目录,不利于图片的复用。
这里尝试一种新的思路:
本地使用相对路径,支持md;再部署时批量去掉路径前的
..,变成网站绝对目录
这样在本地编辑时,使用相对目录,可正常预览md:
1 |  |
完成md编辑后,直接push到在github的master分支hexo工作目录,md也可以正常预览。
修改部署脚本.travis.yml, 在hexo g生成前,使用sed 正则匹配所有_post中的md文件, 原地批量替换:
1 | sed -i '1,$s/](\.\.\/img/](\/img/g' source/_posts/*.md |
在mac上测试的时候会有一点问题,使用
-i参数的时候会报错,可以试用gsed,参考:mac sed -i 报错
2. 方案总结
总体步骤基本按照官方,需要修改.travis.yml. 以下为了方便看,直接复制过来:
- 新建一个 repository。如果你希望你的站点能通过
<你的 GitHub 用户名>.github.io域名访问,你的 repository 应该直接命名为<你的 GitHub 用户名>.github.io, 如:1
madgd/madgd.github.io
- 将你的 Hexo 站点文件夹推送到 repository 中。默认情况下不应该
public目录将不会被推送到 repository 中,你应该检查.gitignore文件中是否包含public一行,如果没有请加上。1
2
3
4
5
6
7.DS_Store
Thumbs.db
db.json
*.log
node_modules/
public/
.deploy*/ - 将 Travis CI 添加到你的 GitHub 账户中。
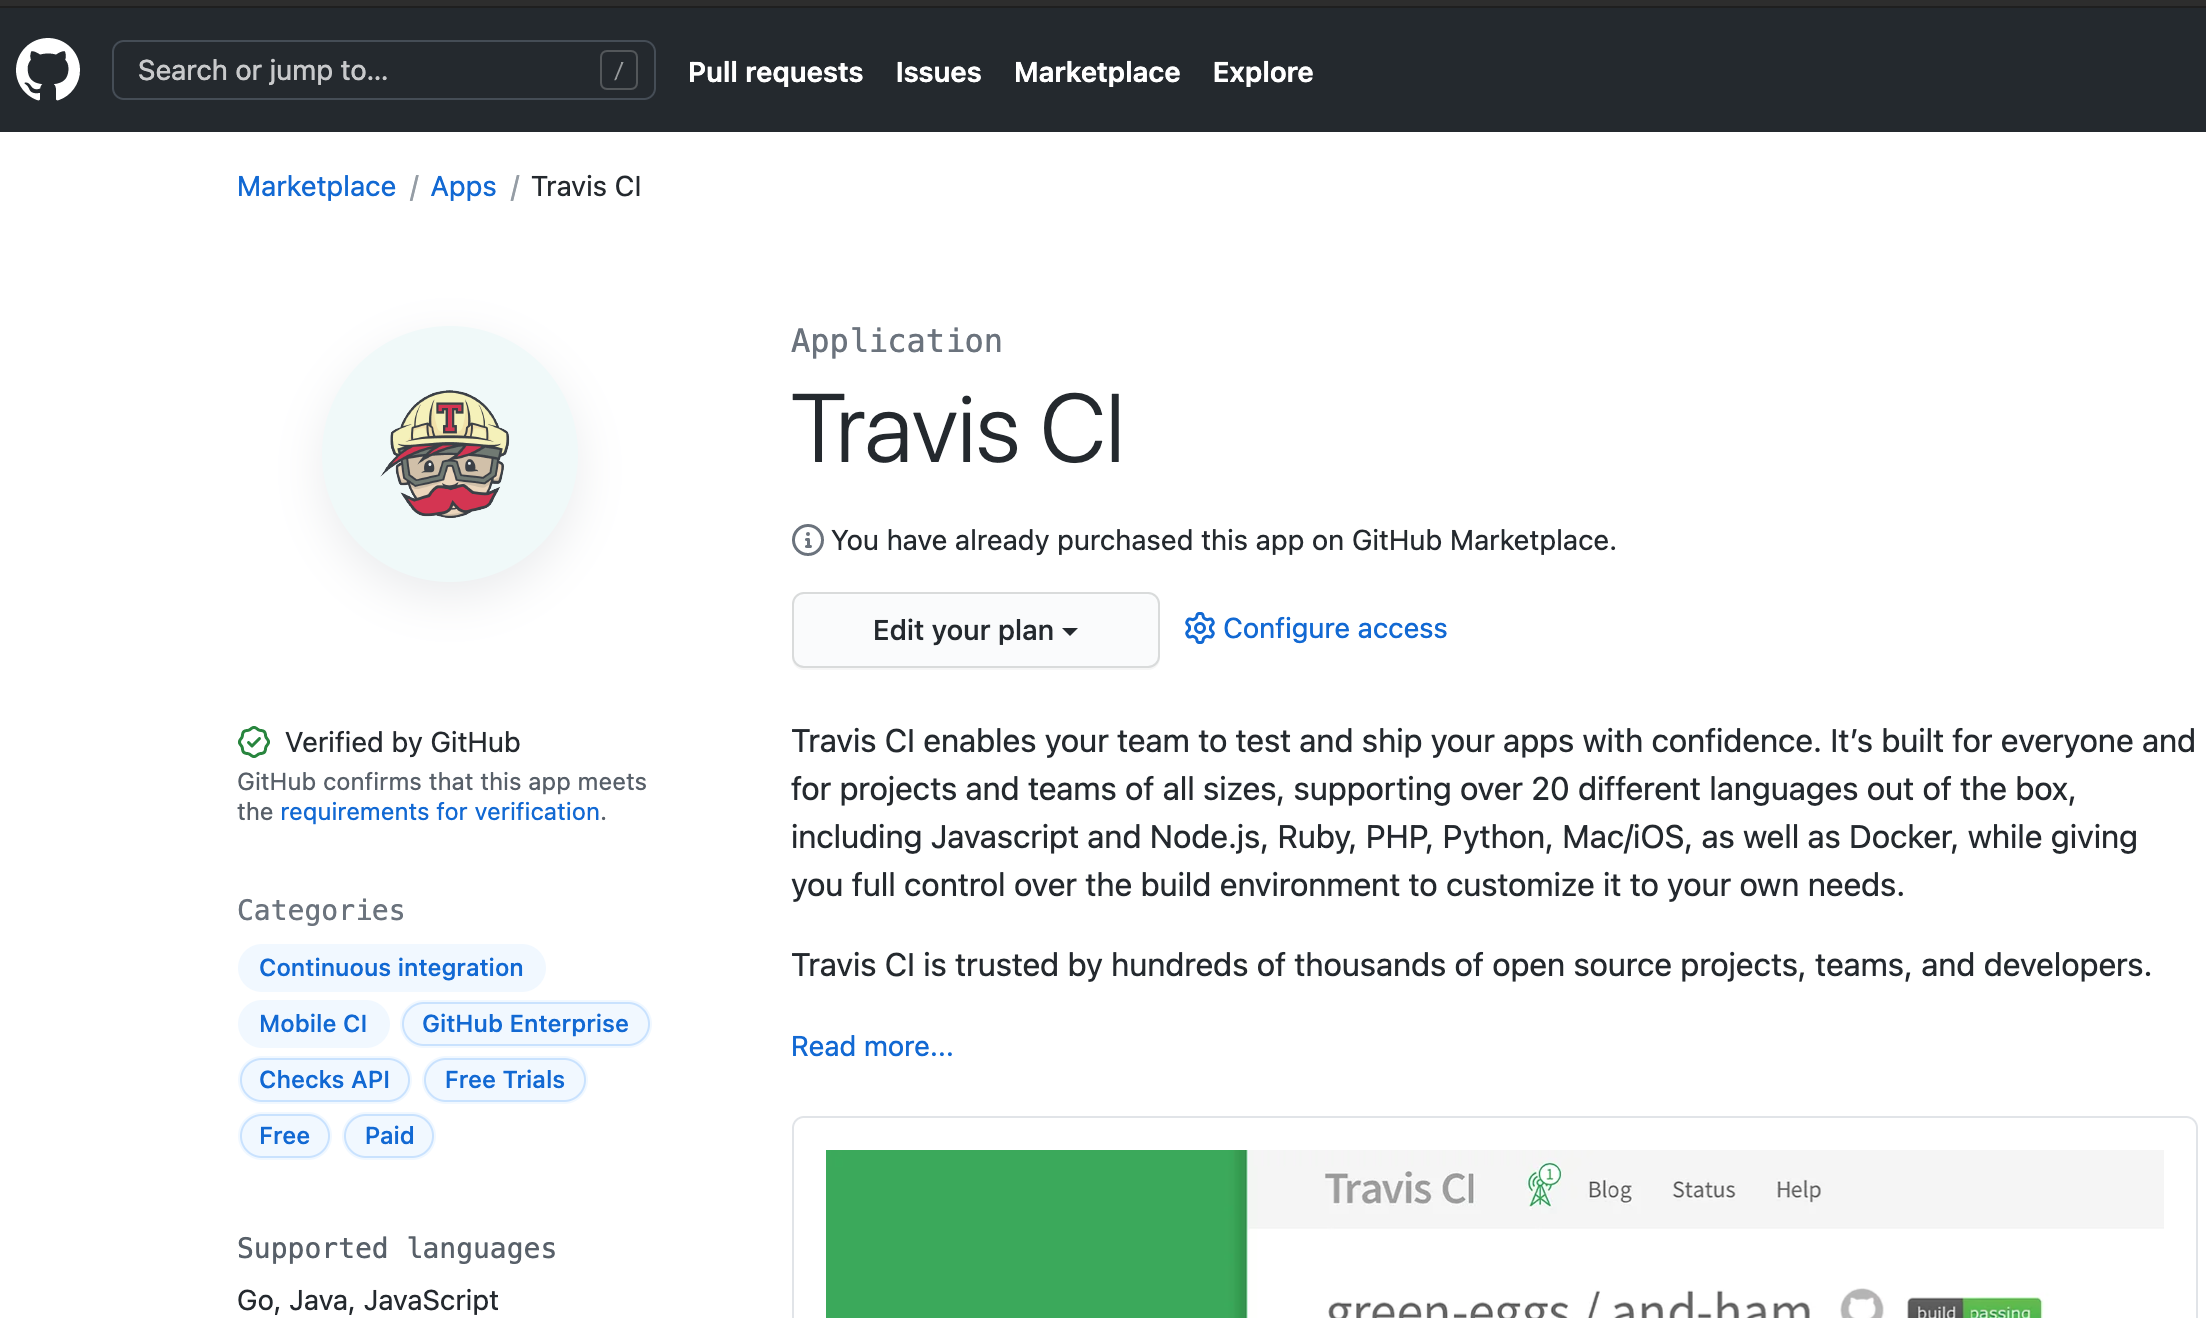
- 前往 GitHub 的 Applications settings,配置 Travis CI 权限,使其能够访问你的 repository。
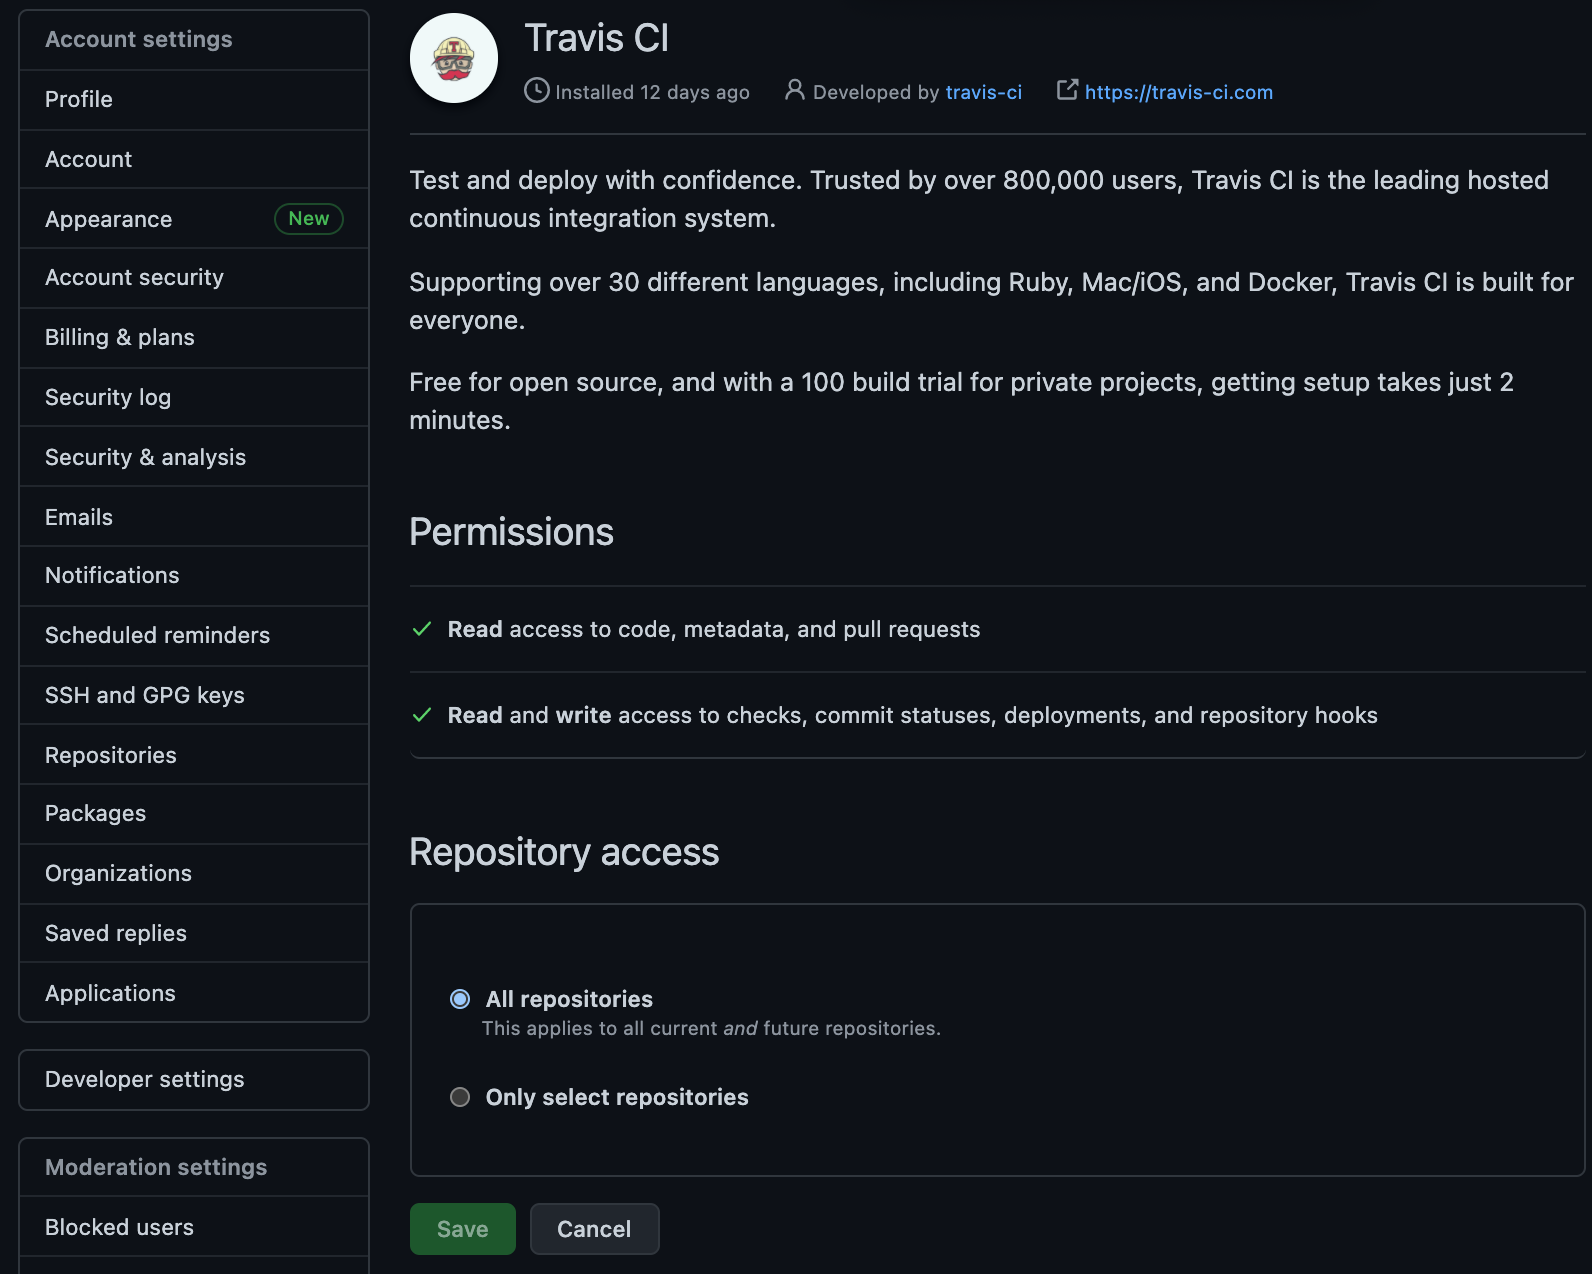
- 你应该会被重定向到 Travis CI 的页面。如果没有,请 手动前往。
- 在浏览器新建一个标签页,前往 GitHub 新建 Personal Access Token,只勾选 repo 的权限并生成一个新的 Token。Token 生成后请复制并保存好。

- 回到 Travis CI,前往你的 repository 的设置页面,在 Environment Variables 下新建一个环境变量,Name 为 GH_TOKEN,Value 为刚才你在 GitHub 生成的 Token。确保 DISPLAY VALUE IN BUILD LOG 保持 不被勾选 避免你的 Token 泄漏。点击 Add 保存。
- 在你的 Hexo 站点文件夹中新建一个 .travis.yml 文件, 经修改最终生成的
.travis.yml文件:1
2
3
4
5
6
7
8
9
10
11
12
13
14
15
16
17
18
19
20
21sudo: false
language: node_js
node_js:
- 15 # use nodejs v15 LTS
cache: npm
branches:
only:
- master # build master branch only
script:
- sed -i '1,$s/](\.\.\/img/](\/img/g' source/_posts/*.md
- hexo cl
- hexo generate # generate static files
deploy:
provider: pages
skip-cleanup: true
github-token: $GH_TOKEN
keep-history: true
on:
branch: master
local-dir: public
target: gh-pages - 将
.travis.yml推送到 repository 中。Travis CI 应该会自动开始运行,并将生成的文件推送到同一 repository 下的gh-pages分支下 - 在 GitHub 中前往你的 repository 的设置页面,修改
GitHub Pages的部署分支为gh-pages。 - 前往
https://<你的 GitHub 用户名>.github.io查看你的站点是否可以访问。可能需要稍等一会儿。
这样,每次更新博客的操作就是:
- hexo new “title”
- 编辑md
- 图片存在
source/img/目录下,md中使用相对路径../img/pic引入图片,本地可正常预览 - 写完后
1
2
3git add .
git commit -m "comment"
git push - 剩下的工作会由
travis持续集成完成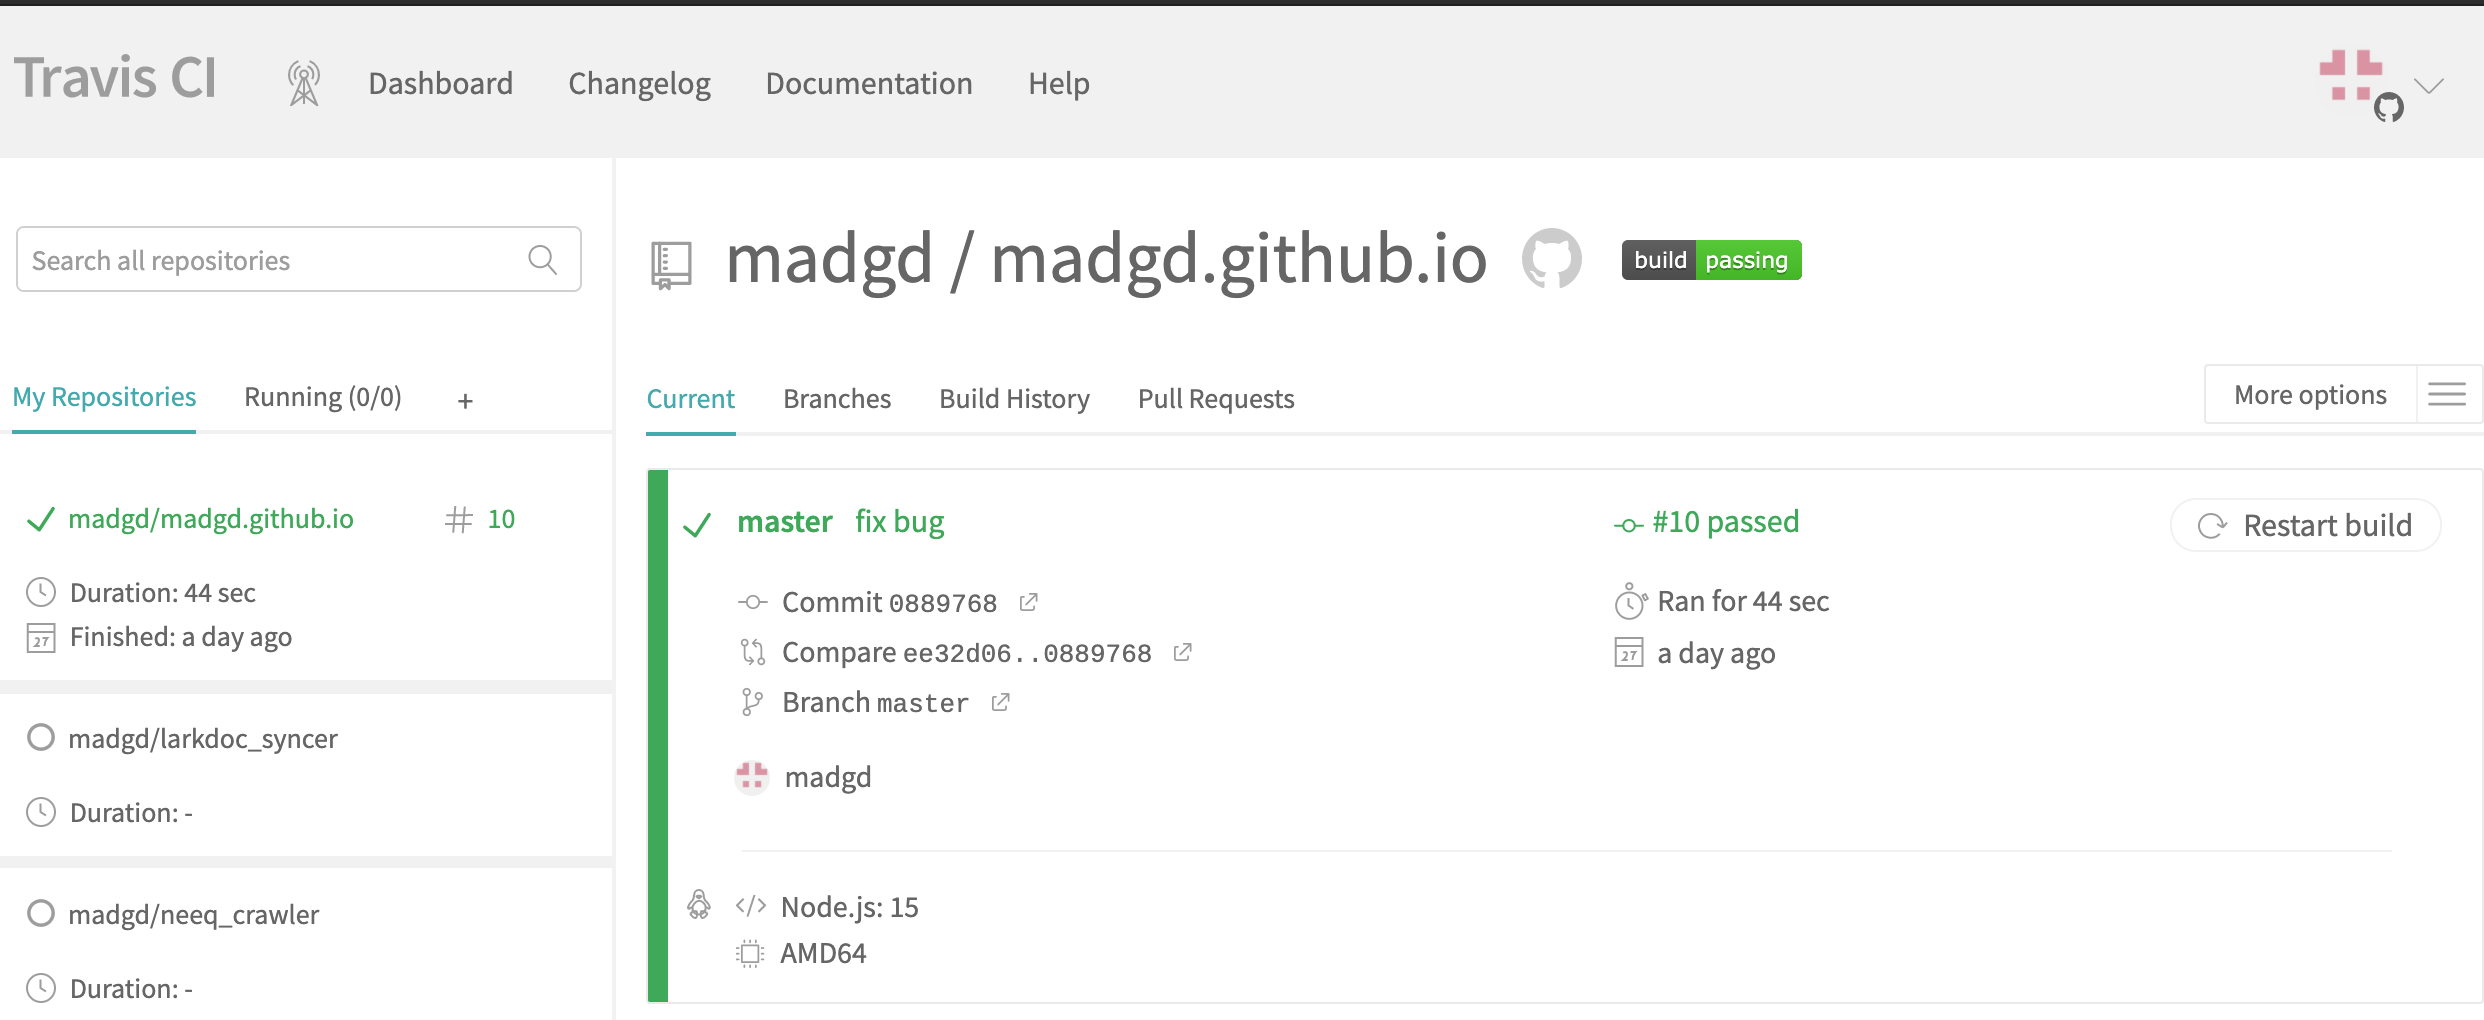
0x02 装修
0. 个性化设置
编辑.config.yml:
1 | title: madgd's blog |
编辑themes/next/_config.yml:
1 | scheme: Gemini |
可参考next使用
1. 开启百度统计&添加阅读量统计&站点统计&google analysis
1.1 百度统计
参考next使用相关章节
效果如图: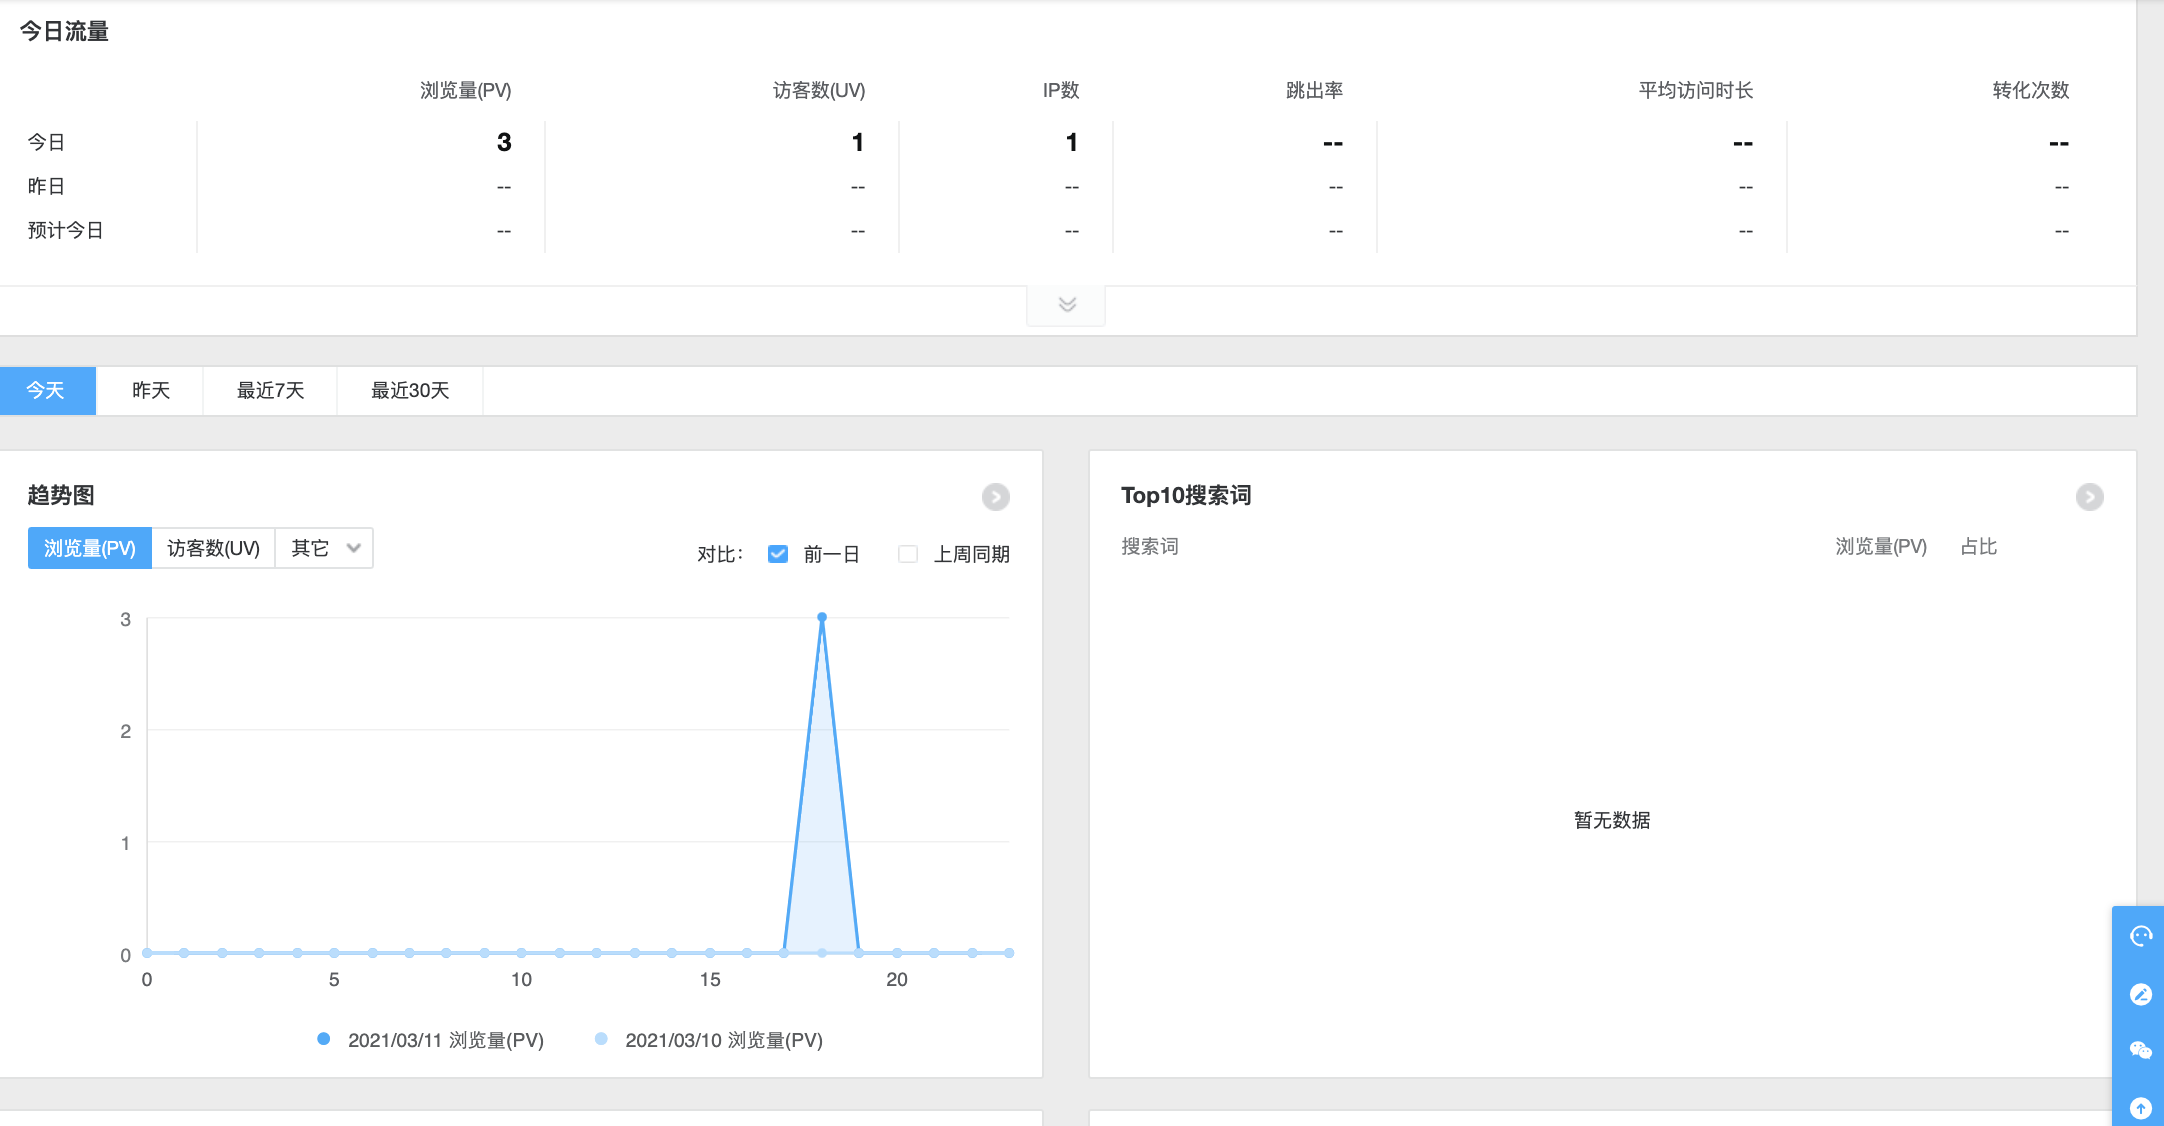
1.2 阅读量统计
注意,按以上步骤配置后并不会立即生效,会提示:
1 | Views: Counter not initialized! More info at console err msg. |
查看console:
1 | ATTENTION! LeanCloud counter has security bug, see how to solve it here: https://github.com/theme-next/hexo-leancloud-counter-security. |
可直接选择修改配置:
1 | security: false |
或者按照hexo-leancloud-counter-security 安装并配置
效果如图: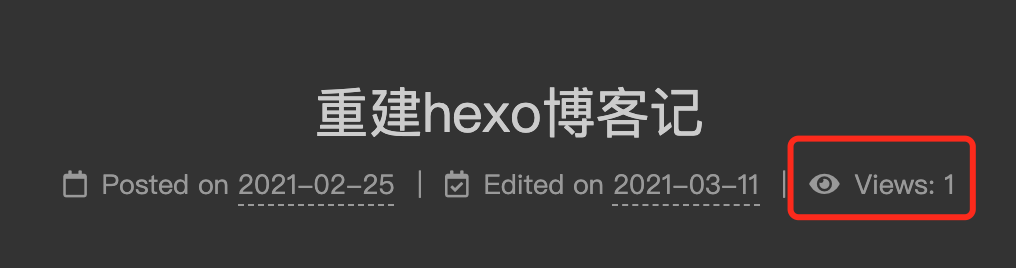
1.3 站点统计
不蒜子统计(这里只开站点统计,不开页面统计):
修改配置themes/next/_config.yml:
1 | # Show Views / Visitors of the website / page with busuanzi. |

1.4 google analysis:
google analysis应该是升级了系统,id有点不一样了:
- 点击开始追踪后一步一步往下填,创建账号
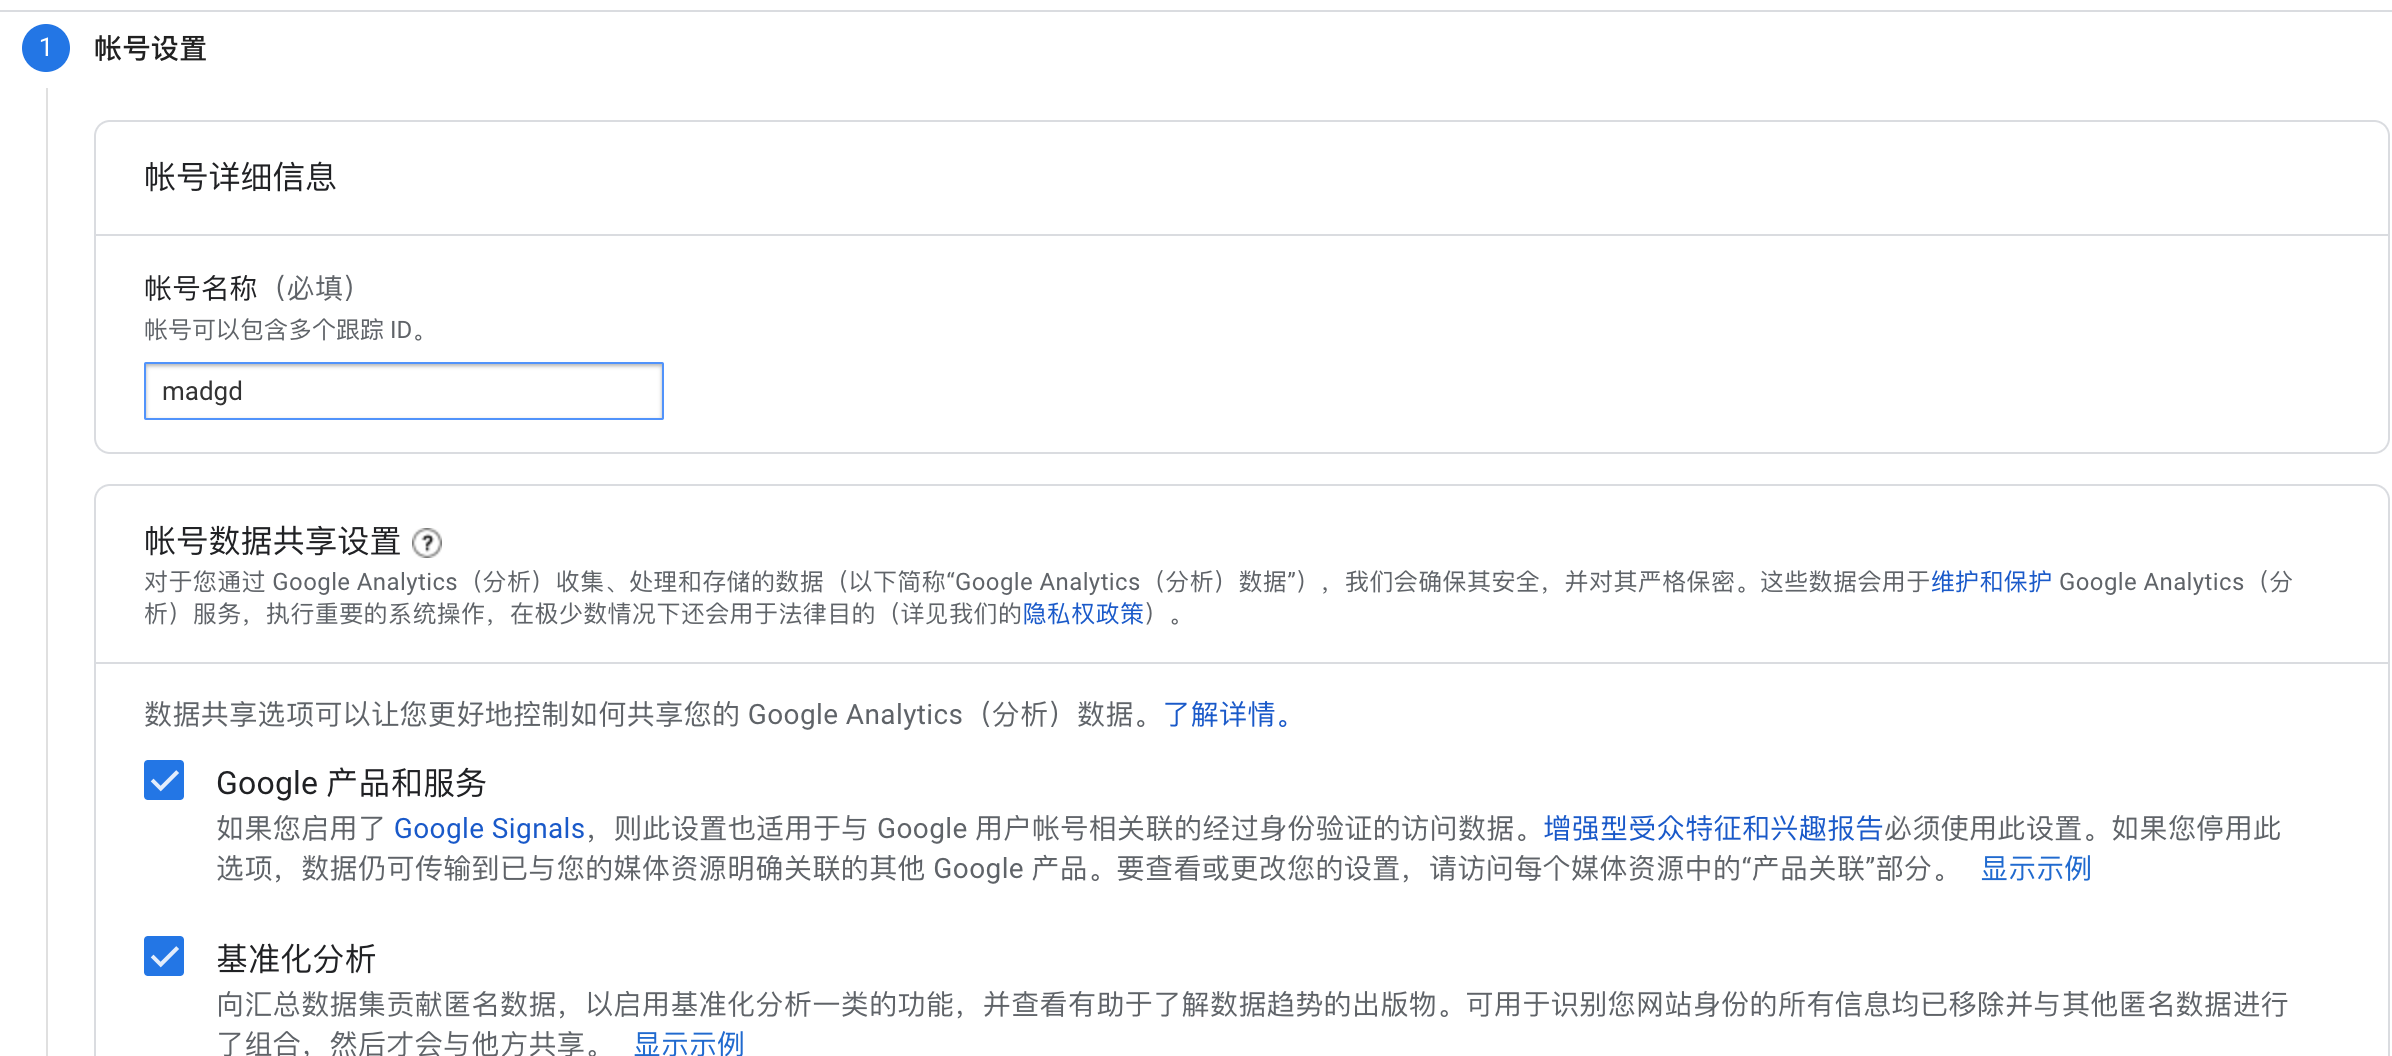
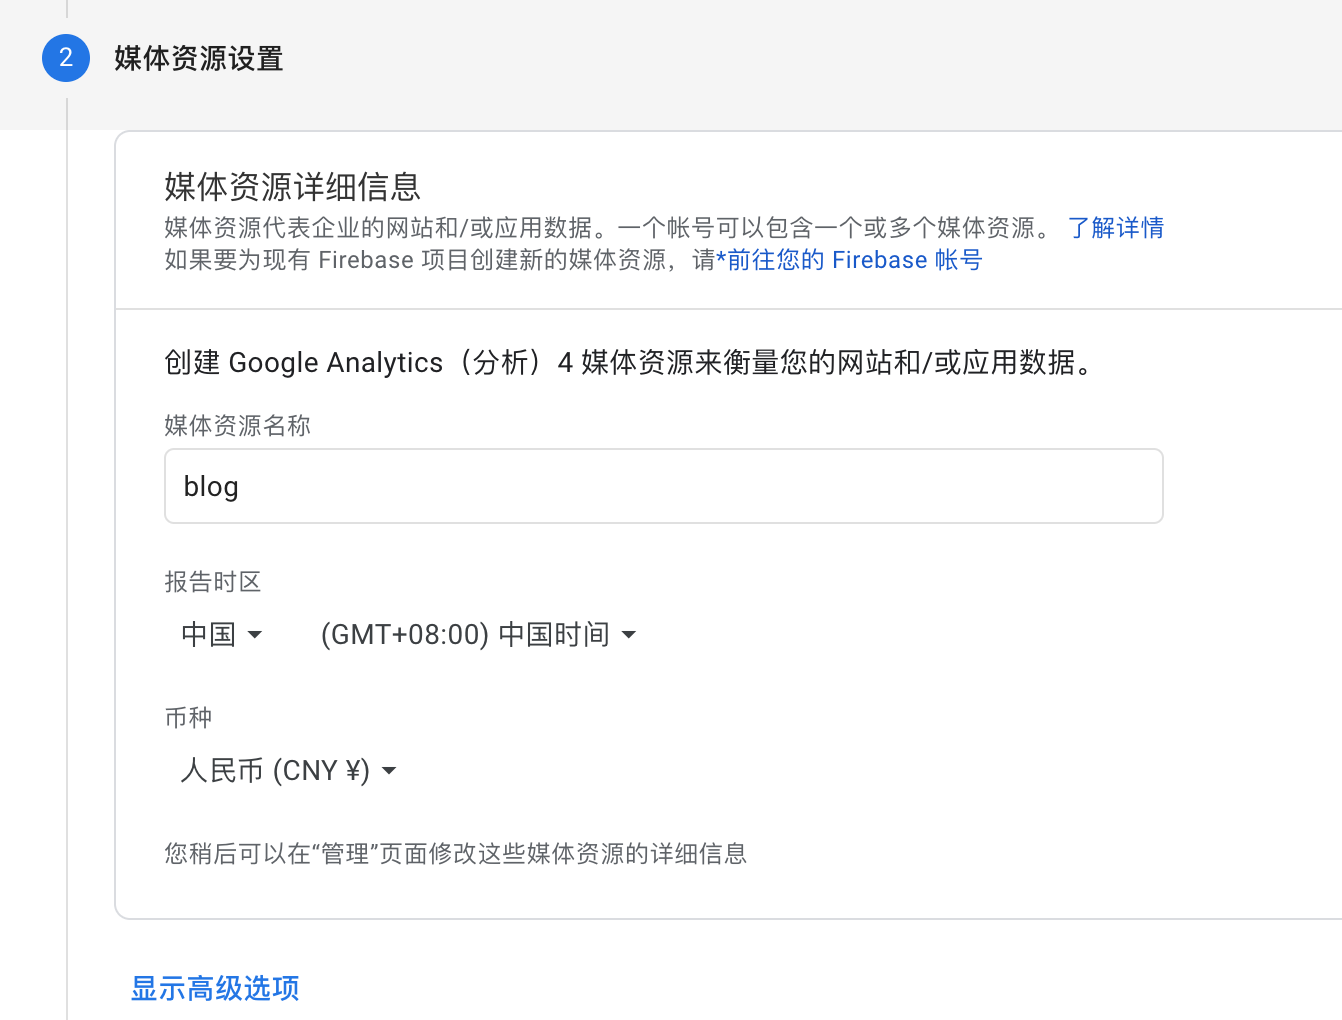
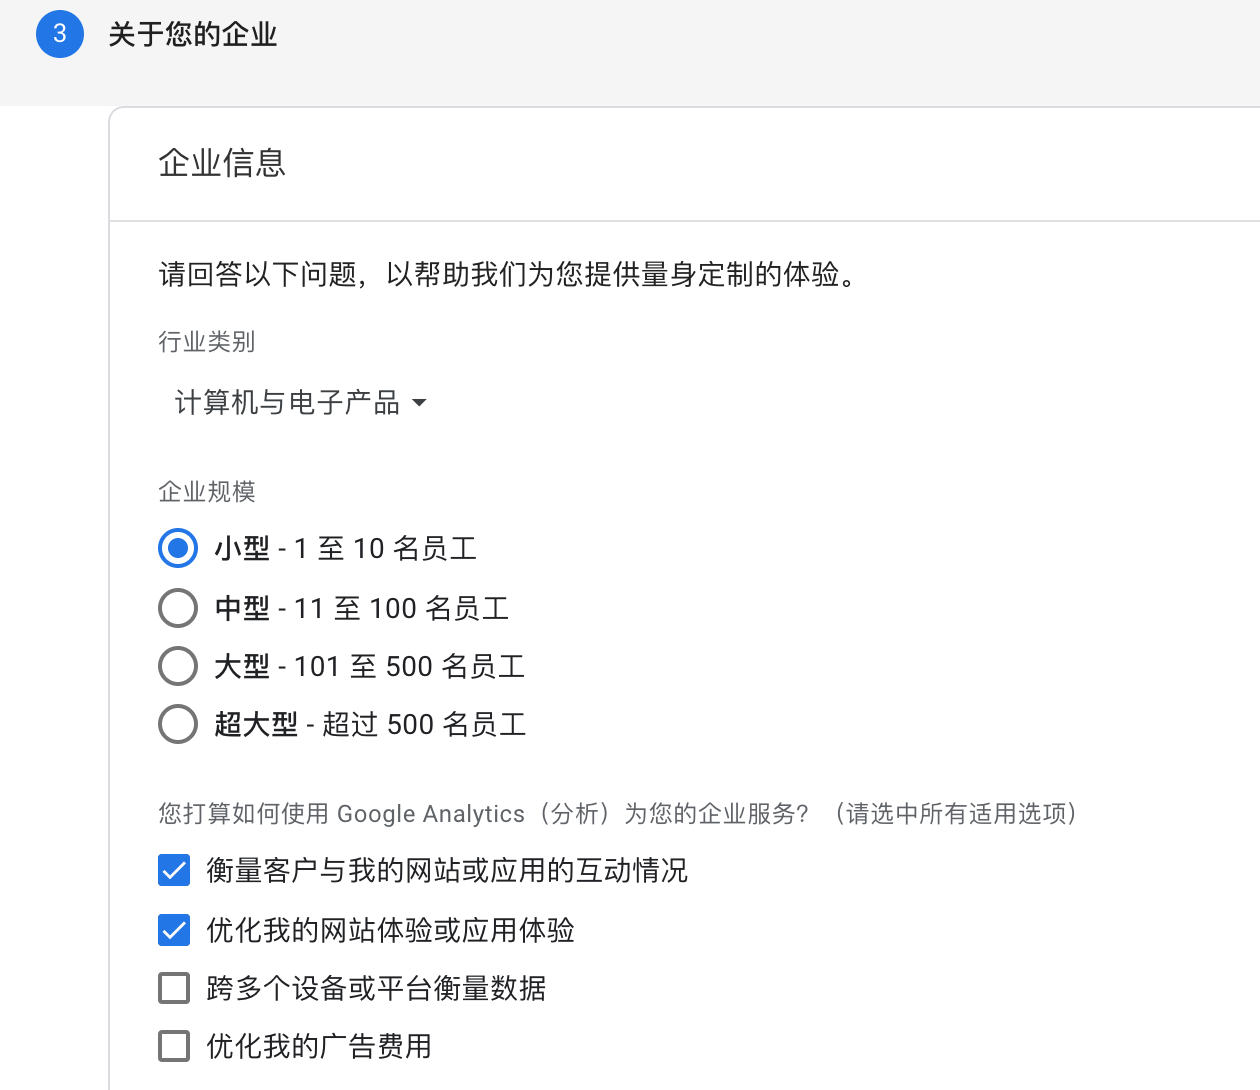
- 新建数据流
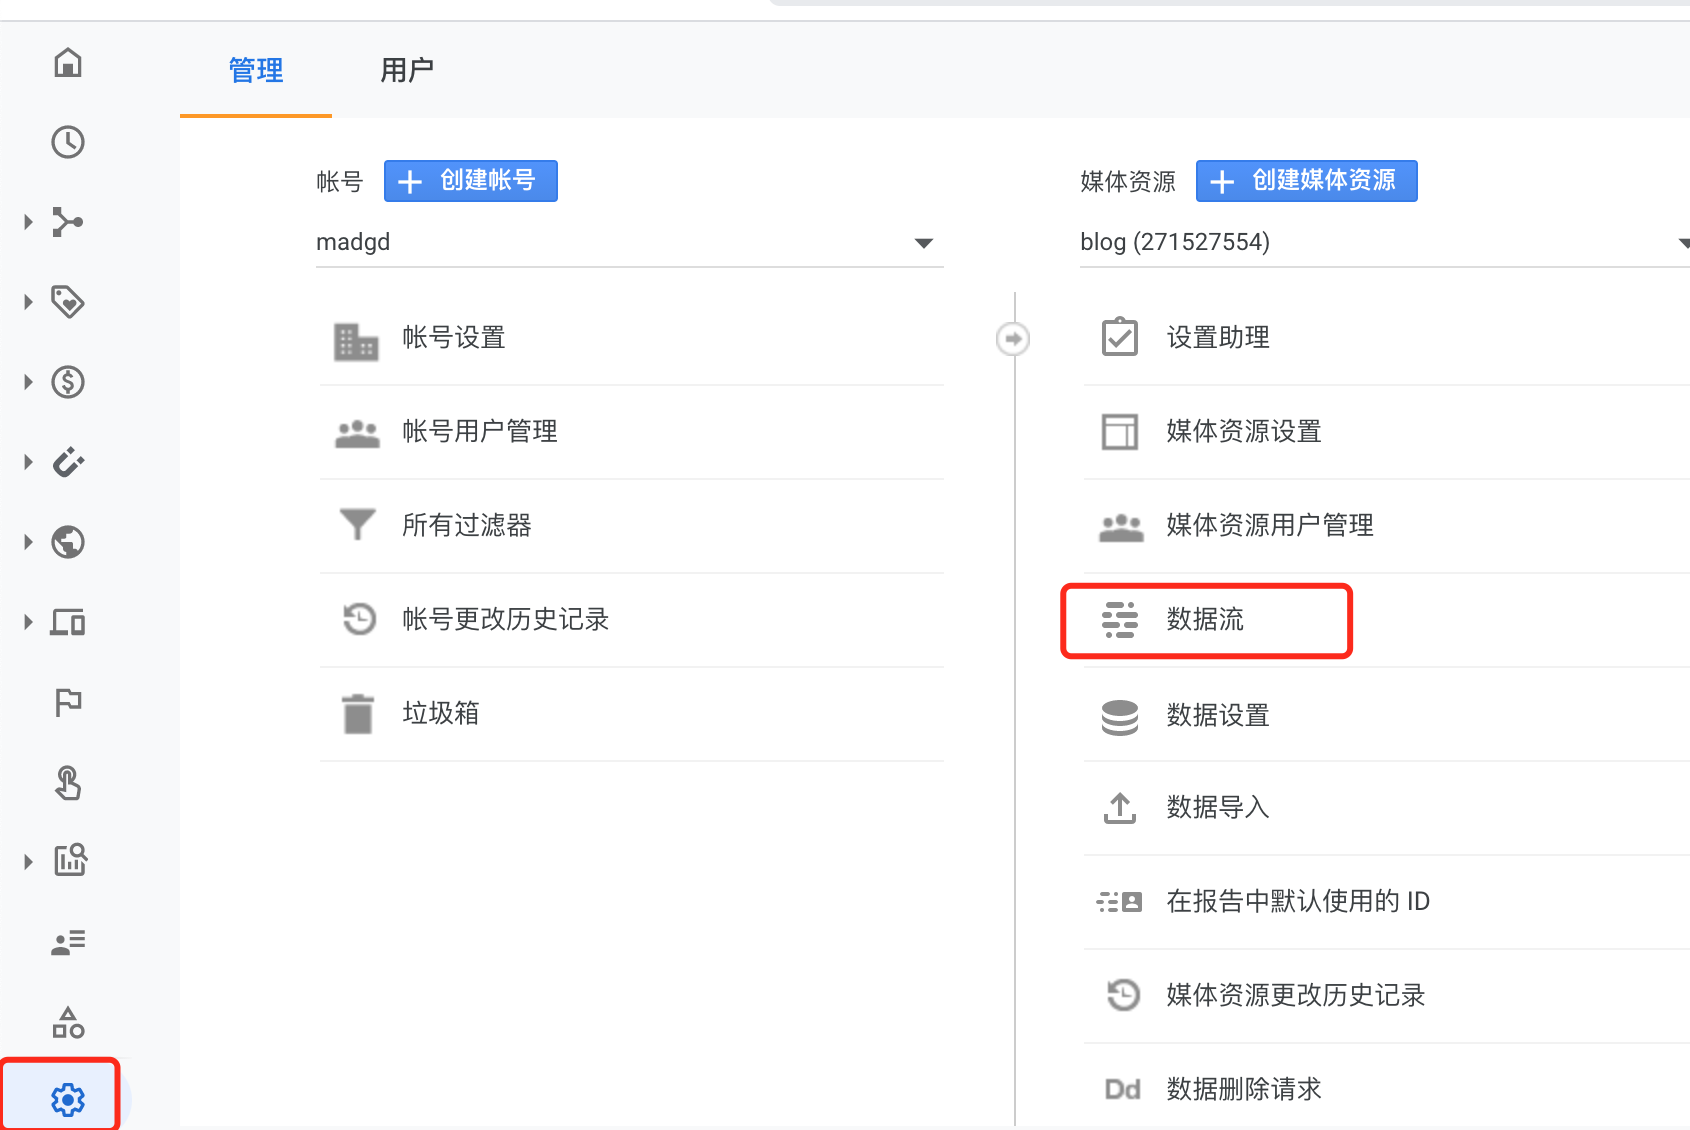
选择网站类型: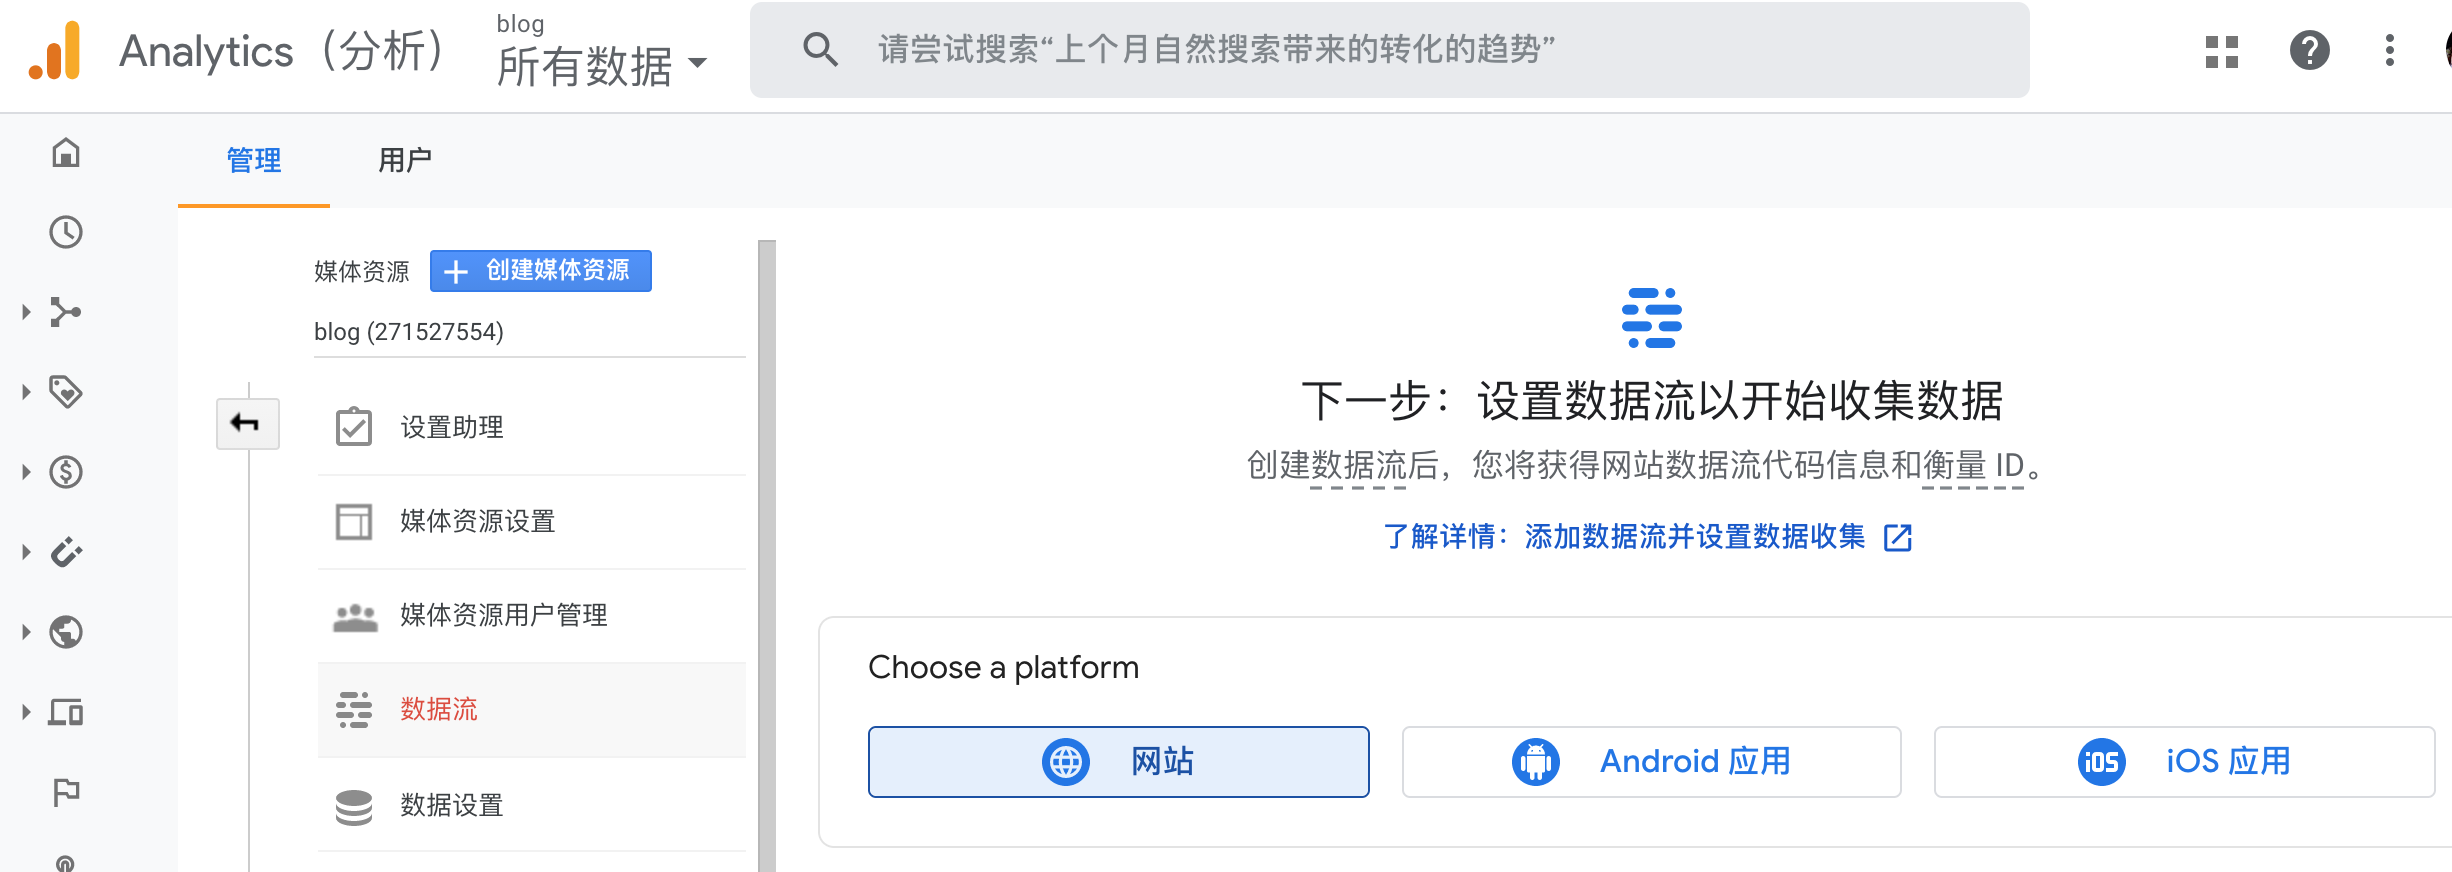
填写站点信息:
- 获取id并配置next yml
现在使用的是G大头的id
G-id:
将改id配置到themes/next/_config.yml并部署:
1 | # Google Analytics |
统计数据会有延迟,耐心等待: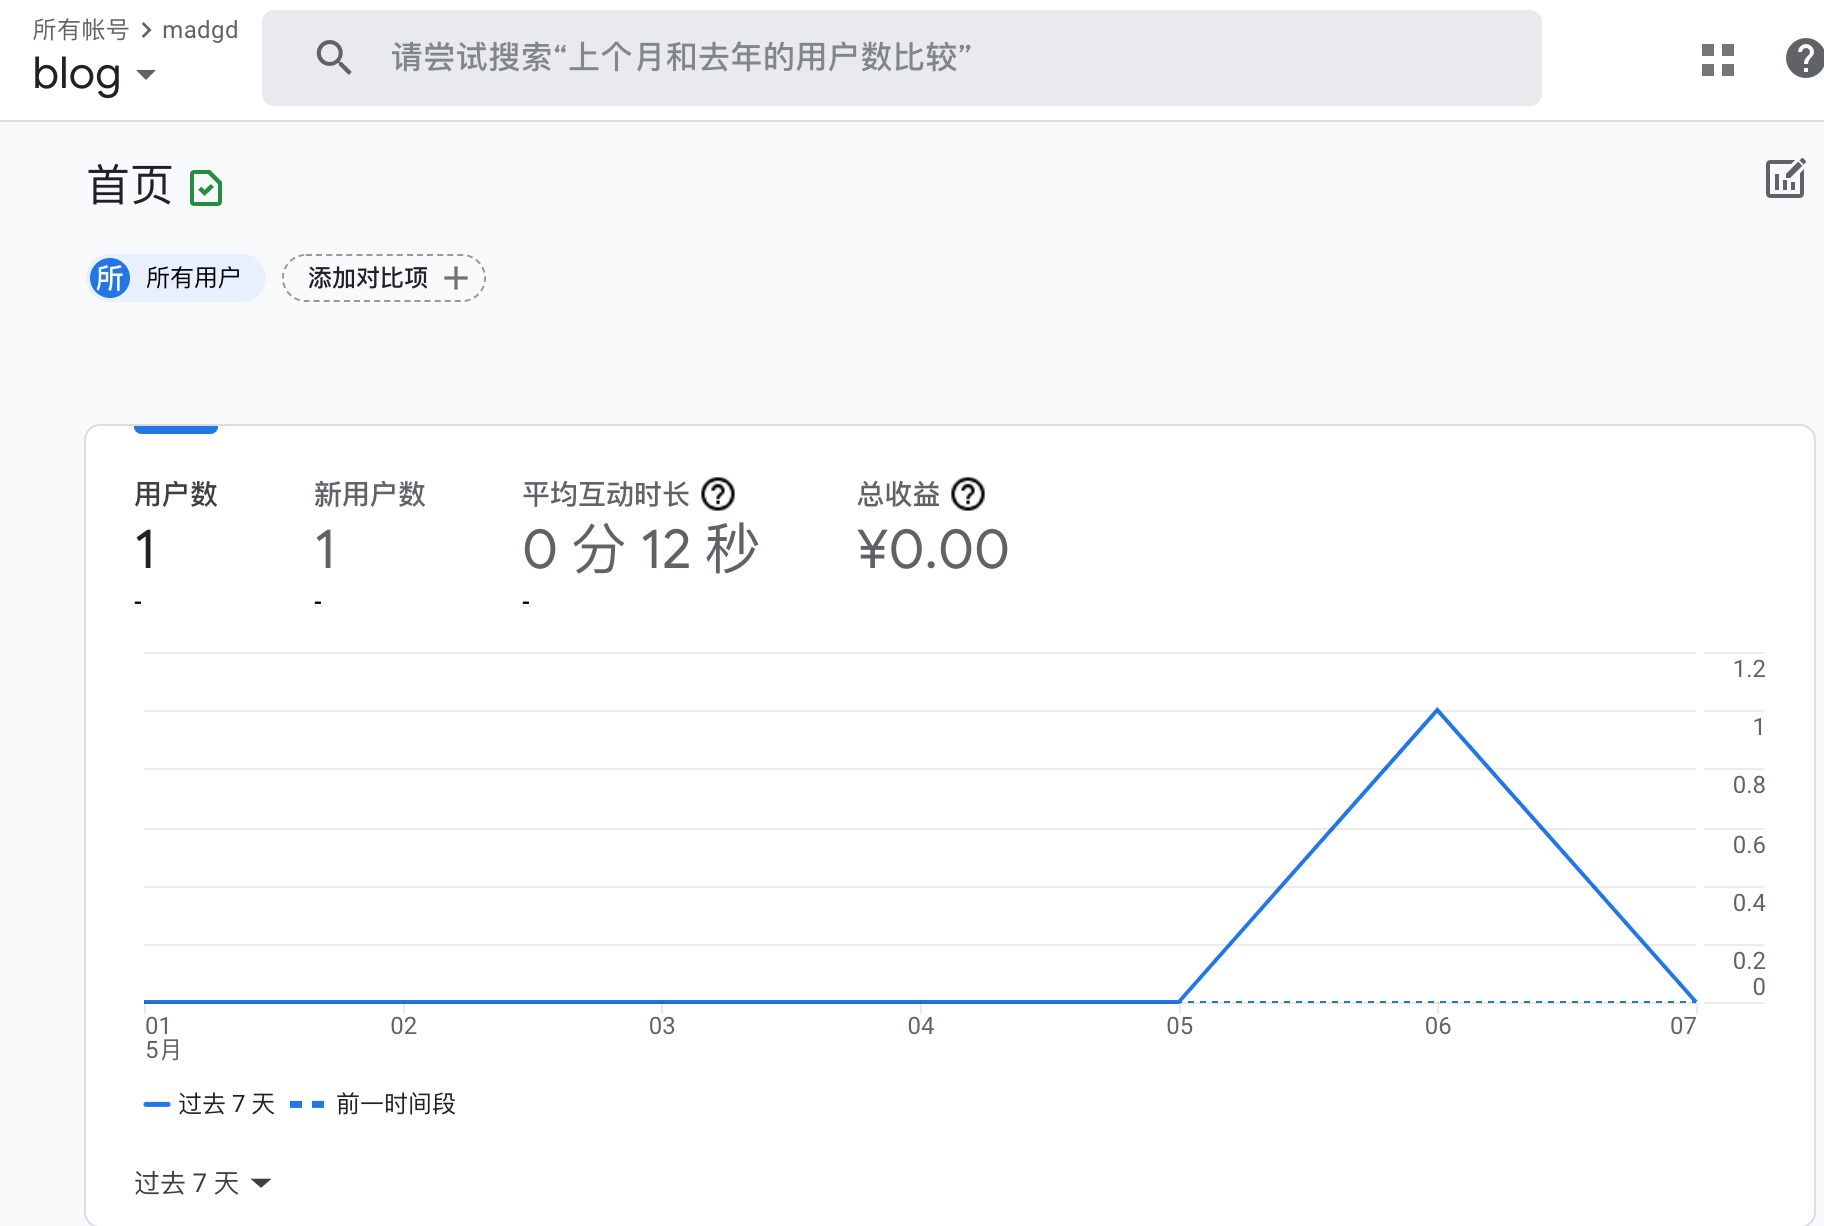
2. 引入评论
常用评论模块有:next评论系统
其中disqus需要翻墙,github类的gitment、gitalk、gitter需要github账号,valine无后端,对用户门槛最低。因此优先接入valine。
2.1 valine
参考这位老哥的方案Hexo博客进阶:为Next主题添加Valine评论系统
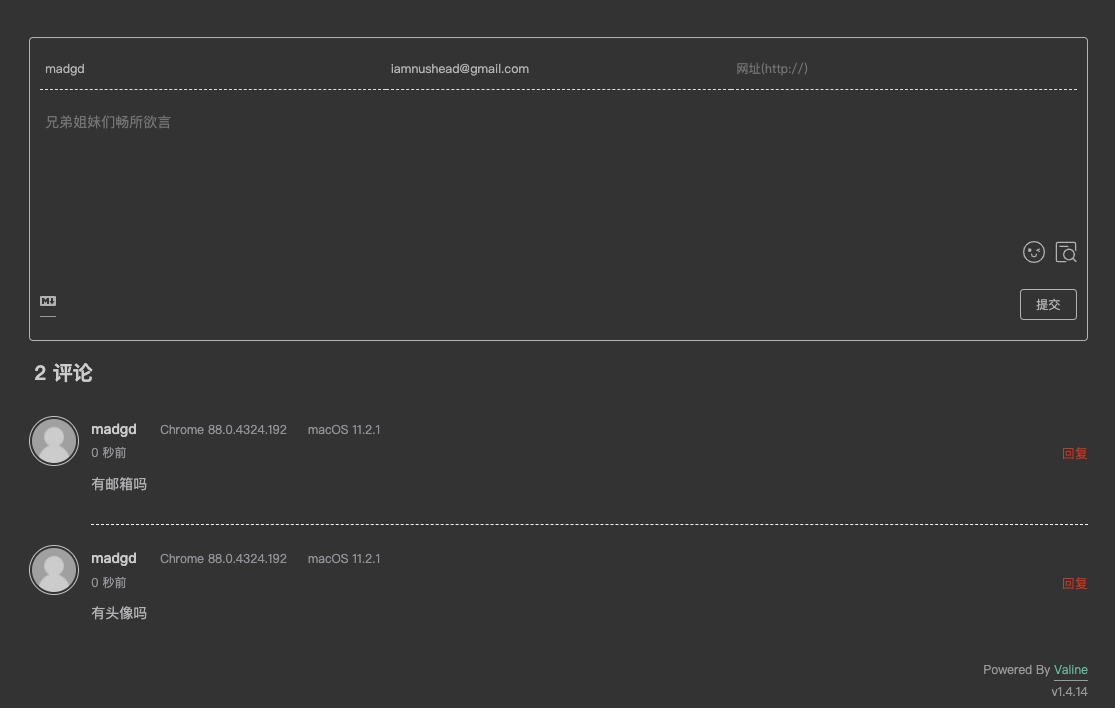
开启新评论邮件提醒:
- 参考以上文档设置leancloud。因leancloud升级,设置页面略有不同,见下图
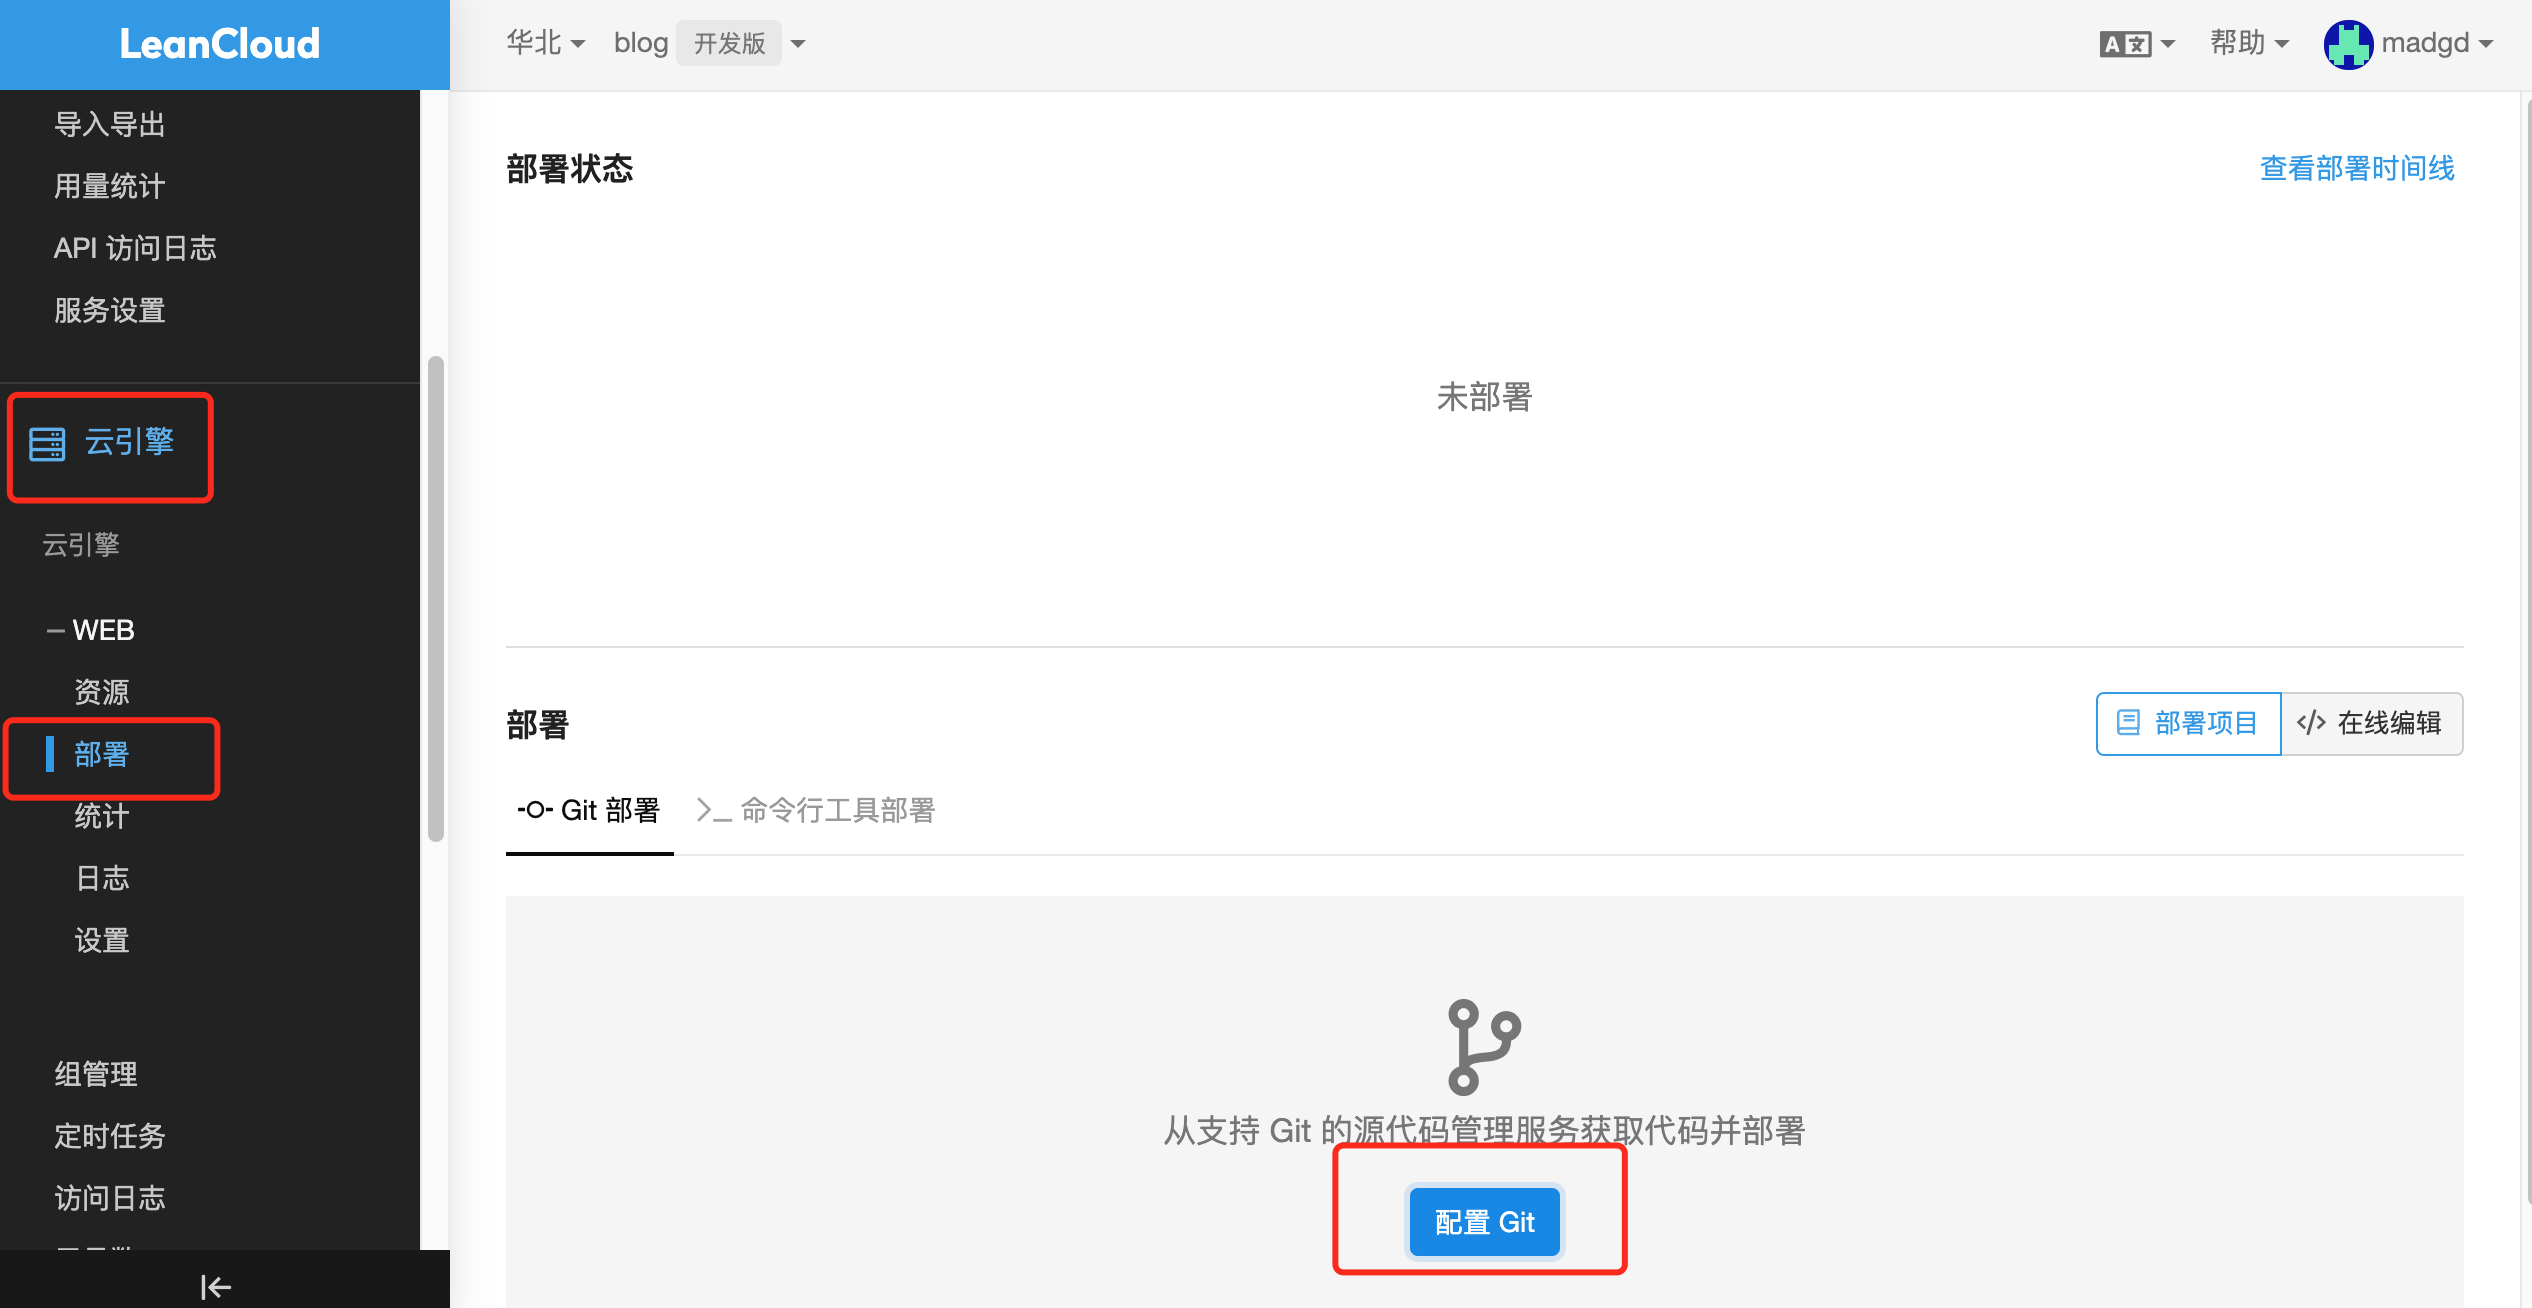
配置结果:
- 设置休眠策略
可参考以上文档中的休眠策略,按相关内容设置。设置leanCloud自带定时器.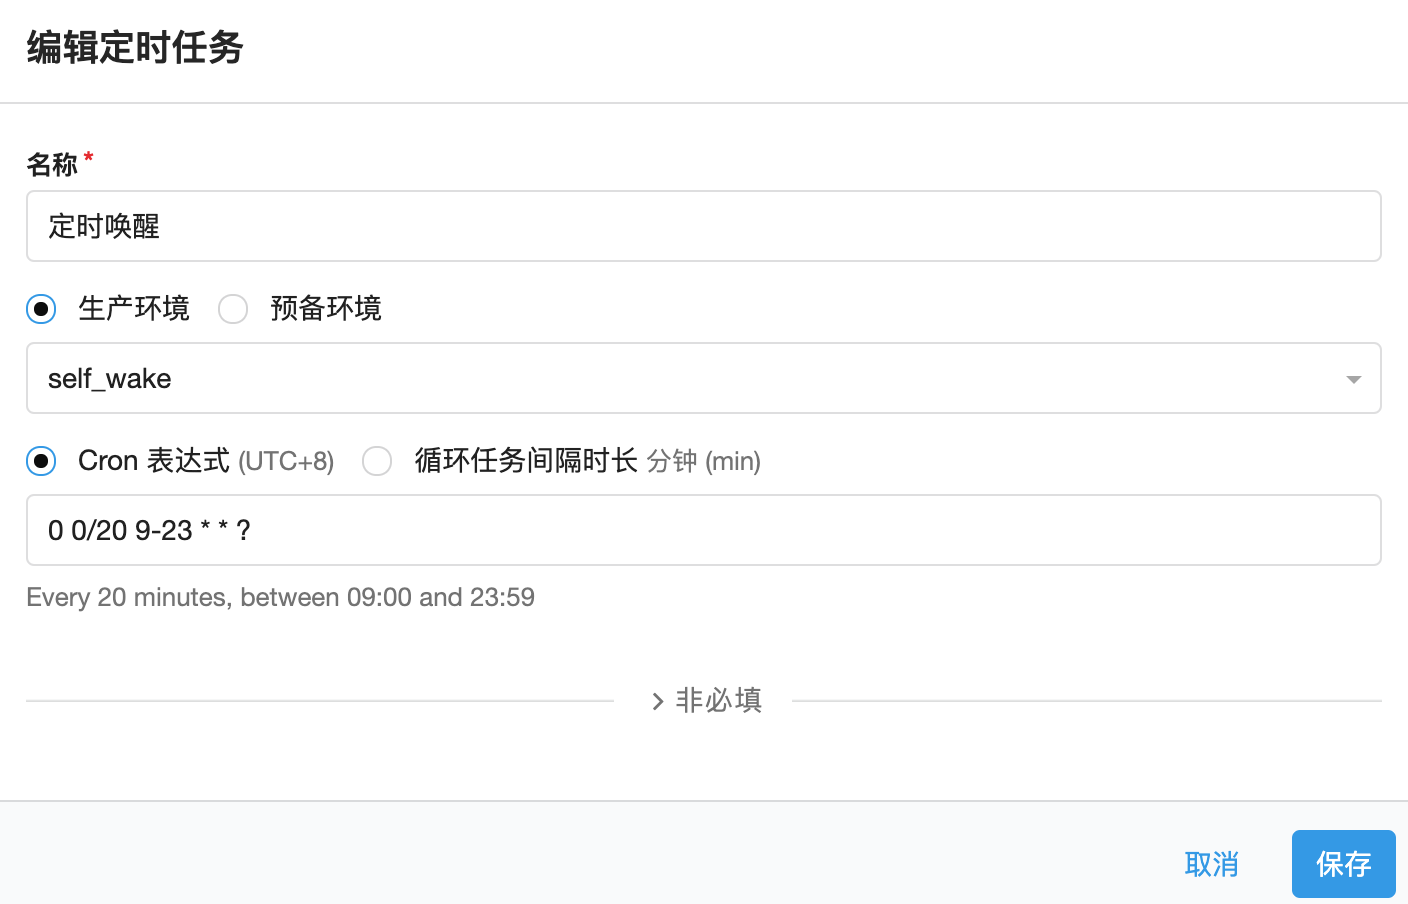
保存完成后,自动启动。可查看日志验证
todo: 利用server酱开启微信通知
2.2 livere
同时,为了支持带图片评论,接入来必力, 方案参考这位老哥的Hexo博客优化之实现来必力评论功能
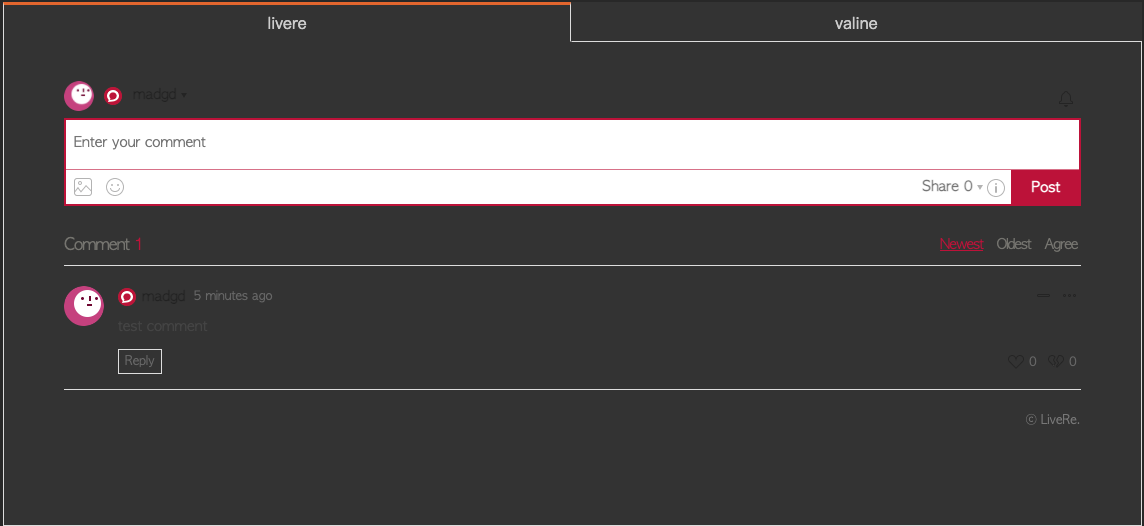
点击头像,管理页面,设置可选择支持登录的sns,单击开关,拖动可调整顺序(个人认为微信什么的要往前放):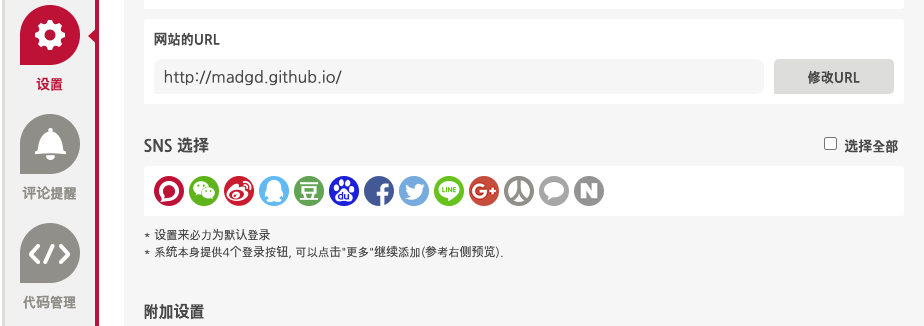
开启新评论邮件提醒: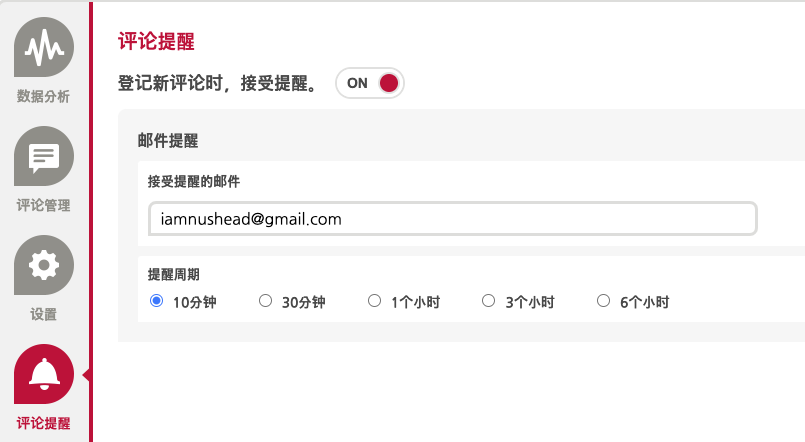
*不知道为什么设置完了就是收不到邮件提醒,哪位老哥了解的请评论区告诉我!
21-04-27 update:偶然在手机上看这一篇,发现livere有类似推荐阅读的功能(韩文。之前在web上看都被adblock干掉了-_-||),设置里面没找到关闭的选项。大家自己判断是否保留
2.3 gitalk
再考虑接入支持github登录管理的,参考gitalk:
申请个GitHub Application,Homepage URL和Authorization callback URL就写成博客地址就行
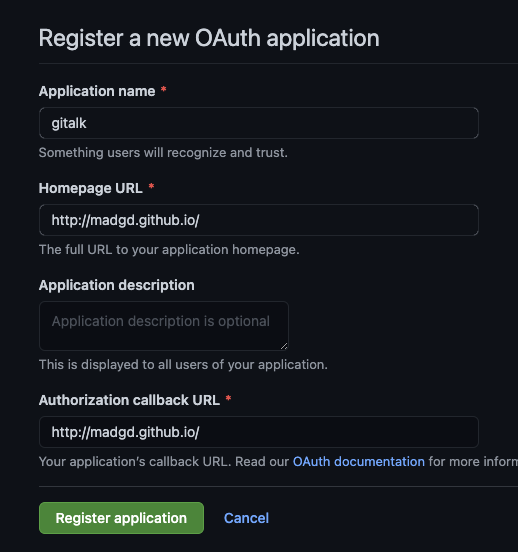
提交后会生成clinet ID,点击
Generate a new client secret按钮,生成一个client secrets配置
themes/next/_config.yml:1
2
3
4
5
6
7gitalk:
enable: true
github_id: madgd # GitHub repo owner
repo: madgd.github.io # Repository name to store issues
client_id: # GitHub Application Client ID
client_secret: # GitHub Application Client Secret
distraction_free_mode: true # Facebook-like distraction free mode此时会提示
Related Issues not found,使用自己的github账号第一次登录到新建的博文下的gitalk模块,会自动生成相应的issue。所以养成发文后自己先验证一下效果的习惯即可。当然也可以使用脚本自动初始化issue开启新评论邮件提醒:
在github中点击右上角头像,Settings->Emails确认邮箱;然后点击Notifications,根据自己的需要,调整通知选项即可。在自己的博客项目主页右上角,点击watch即可注意自己的邮箱是否将通知提醒识别为垃圾邮件。Email notification preferences:
- Comments on Issues and Pull Requests
21-05-06 update: 如果出现登陆gitalk时重定向到主页,可能是重定向问题,参考,将OAuth Apps 中的 重定向地址改 为 和配置_config.yml以及实际博客地址一致
2.4 disqus
也试下主流的disqus,参考hexo开启disqus:
申请disqus账号
配置
themes/next/_config.yml:1
2
3
4disqus:
enable: true
shortname: your_disqus_short_name
count: true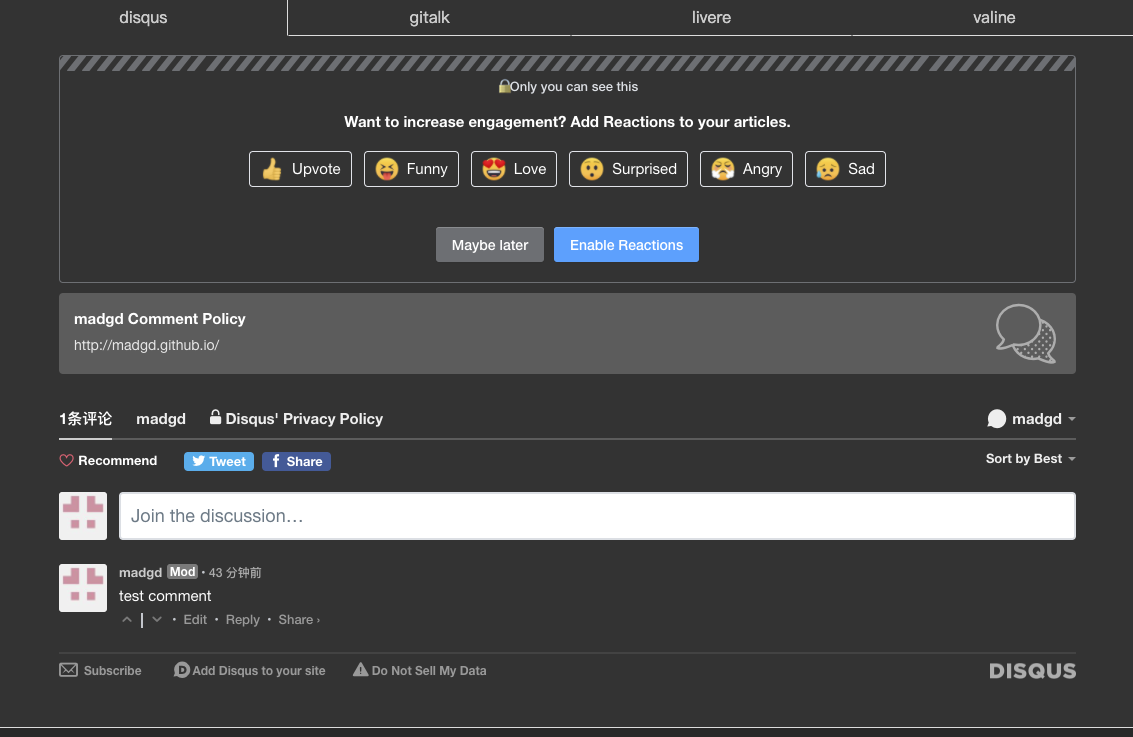
开启新评论邮件提醒
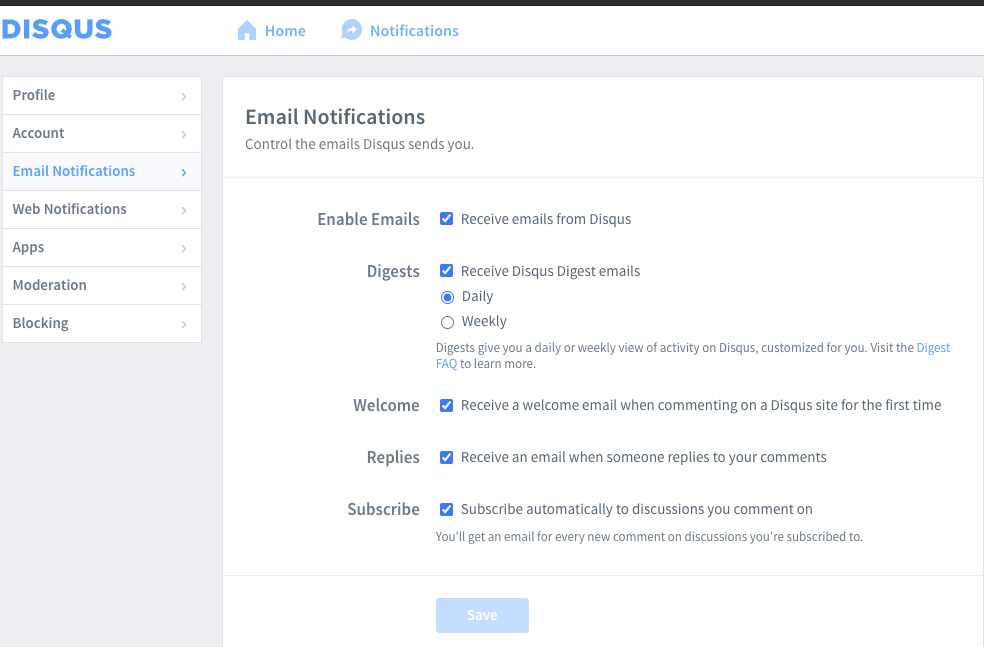
*不知道为什么设置完了就是收不到邮件提醒,哪位老哥了解的请评论区告诉我!
2.5 调整评论模块的展示
themes/next/_config.yml:
1 | comments: |
3. 添加fork me on github
文件位置:\themes\next\layout_layout.swig,在
下一行添加如下代码。1 | <a href="https://www.github.com/madgd" class="github-corner" aria-label="View source on Github"><svg width="80" height="80" viewBox="0 0 250 250" style="fill:#151513; color:#fff; position: absolute; top: 0; border: 0; right: 0;" aria-hidden="true"><path d="M0,0 L115,115 L130,115 L142,142 L250,250 L250,0 Z"></path><path d="M128.3,109.0 C113.8,99.7 119.0,89.6 119.0,89.6 C122.0,82.7 120.5,78.6 120.5,78.6 C119.2,72.0 123.4,76.3 123.4,76.3 C127.3,80.9 125.5,87.3 125.5,87.3 C122.9,97.6 130.6,101.9 134.4,103.2" fill="currentColor" style="transform-origin: 130px 106px;" class="octo-arm"></path><path d="M115.0,115.0 C114.9,115.1 118.7,116.5 119.8,115.4 L133.7,101.6 C136.9,99.2 139.9,98.4 142.2,98.6 C133.8,88.0 127.5,74.4 143.8,58.0 C148.5,53.4 154.0,51.2 159.7,51.0 C160.3,49.4 163.2,43.6 171.4,40.1 C171.4,40.1 176.1,42.5 178.8,56.2 C183.1,58.6 187.2,61.8 190.9,65.4 C194.5,69.0 197.7,73.2 200.1,77.6 C213.8,80.2 216.3,84.9 216.3,84.9 C212.7,93.1 206.9,96.0 205.4,96.6 C205.1,102.4 203.0,107.8 198.3,112.5 C181.9,128.9 168.3,122.5 157.7,114.1 C157.9,116.9 156.7,120.9 152.7,124.9 L141.0,136.5 C139.8,137.7 141.6,141.9 141.8,141.8 Z" fill="currentColor" class="octo-body"></path></svg></a><style>.github-corner:hover .octo-arm{animation:octocat-wave 560ms ease-in-out}@keyframes octocat-wave{0%,100%{transform:rotate(0)}20%,60%{transform:rotate(-25deg)}40%,80%{transform:rotate(10deg)}}@media (max-width:500px){.github-corner:hover .octo-arm{animation:none}.github-corner .octo-arm{animation:octocat-wave 560ms ease-in-out}}</style> |
4. 引入搜索服务
5. 添加网易云音乐
参考这位老哥添加网易云音乐
6. 添加分享
注册完成后,点击右上角Get The Code,获取pubid=后面的id,修改配置
1 | add_this_id: *** |
点击左上角Tools,可设置分享样式。
7. 首页不显示文章全文
参考
安装hexo-excerpt:
1 | npm install -save hexo-excerpt |
注意hexo-auto-excerpt已失效
编辑_config.yml:
1 | excerpt: |
可以通过在博文中任意想截取的地方添加<!-- more -->完成自定义长度的摘要。这样在本标识之前的就为博文摘要。
8. 添加字数统计/阅读时长
next主题已支持hexo-symbols-count-time,使用该方案。
安装:
1 | npm install --save hexo-symbols-count-time |
修改_config.yml:
1 | # symbols_count_time |
themes/next/_config.yml:
1 | symbols_count_time: |
9. 添加”About”/“Tags”/“Categries”/“404”标签
参考这位老哥关于
关于的内容可自行编写md
10. 添加打赏
next主题已经支持
修改配置themes/next/_config.yml:
1 | # Reward (Donate) |
在微信、支付宝等内生成收款二维码,放到相应目录中即可

11. 添加rss订阅
参考这位老哥给 Hexo 中的 Next 主题添加 RSS 功能
12. 添加背景动效
next主题自带集中背景动效支持,但需先安装依赖包
1 | $ cd themes/next |
配置主题themes/next/_config.yml:
1 | # JavaScript 3D library. |
13. 添加加载进度条
14. 添加看板娘
使用大佬张书樵修改过得方案:在网页中添加 Live2D 看板娘
添加依赖:
1 | git clone https://github.com/stevenjoezhang/live2d-widget source/live2d-widget |
配置source/live2d-widget/autoload.js:
1 | const live2d_path = "/live2d-widget/"; |
修改themes/next/layout/_layout.swig,在</head>前添加:
1 | ... |
重新预览可看到效果。
如果涉及到嵌套git的问题,可以在git add前,把live2d-widget的git信息删除:
1 | rm -rf source/live2d-widget/.git |
不知道有什么好办法,这里偷懒解决了。
自定义调整,参考:
1 | autoload.js:自动加载看板娘 |
修改waifu.css:
1 | #waifu { |
15. 开启版权声明
查看issue可知,原post_copyright配置已经移除,使用新的配置themes/next/_config.yml:
1 | creative_commons: |
16. 置顶和隐藏
安装:
1 | npm install hexo-generator-indexed |
在post头部的Front-matter中添加以下配置:
置顶:sticky: 100,数字越大置顶优先级越高
隐藏:hide: true
17. 站点地图
安装:
1 | $ npm install hexo-generator-sitemap --save |
配置_config.yml:
1 | sitemap: |
themes/next/_config.yml:
1 | menu: |
点击站点地图会看到sitemap.xml的文件
18. 向搜索引擎自动提交索引编制请求
hexo-submit-urls-to-search-engine 中文文档中已经很详细了。有疑问一定看一下评论区,也许已有前辈提问过
配置google部署时注意:
一定要记得在旧的网站站长工具中添加 Project.json 中的 client_email到所有者
12. 添加google ad
12.1 注册google ad账号
进入 Google AdSense主页,点击 “开始使用”,跟随页面提示填好各项信息, 或获得一段代码,要求放到<head></head> 标记中.
12.2 部署审核
在站点根目录下新建source/_data/文件夹,在其中新建head.swig文件:
1 | # 上一步获取到的代码 |
将themes/next/_config.yml中的注释打开:
1 | custom_file_path: |
部署,并验证<head></head>中的代码,提交审核。
焦急等待了两周之后,审核结果却是一瓢冷水: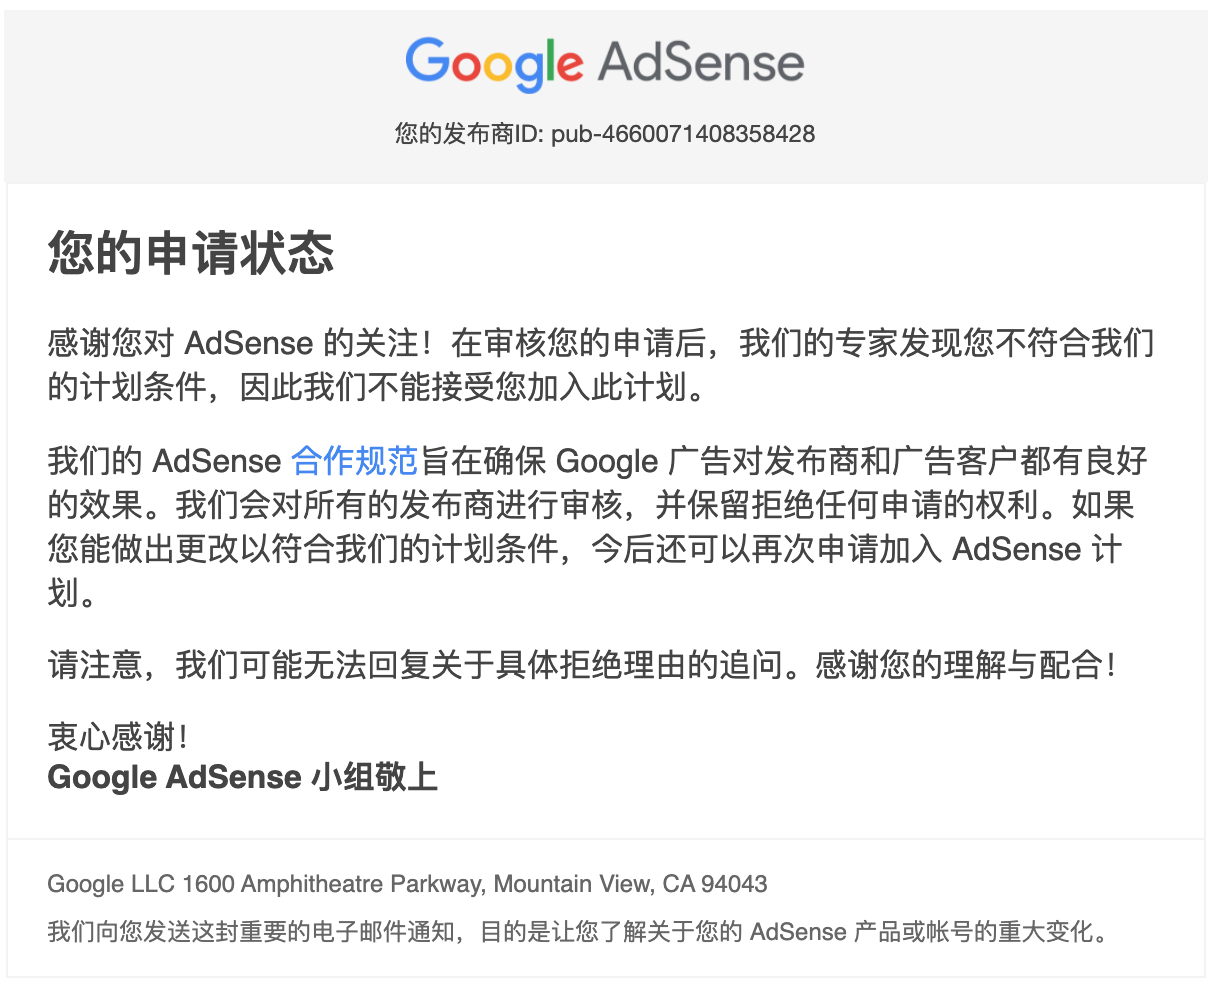
打开adsense主页,看到: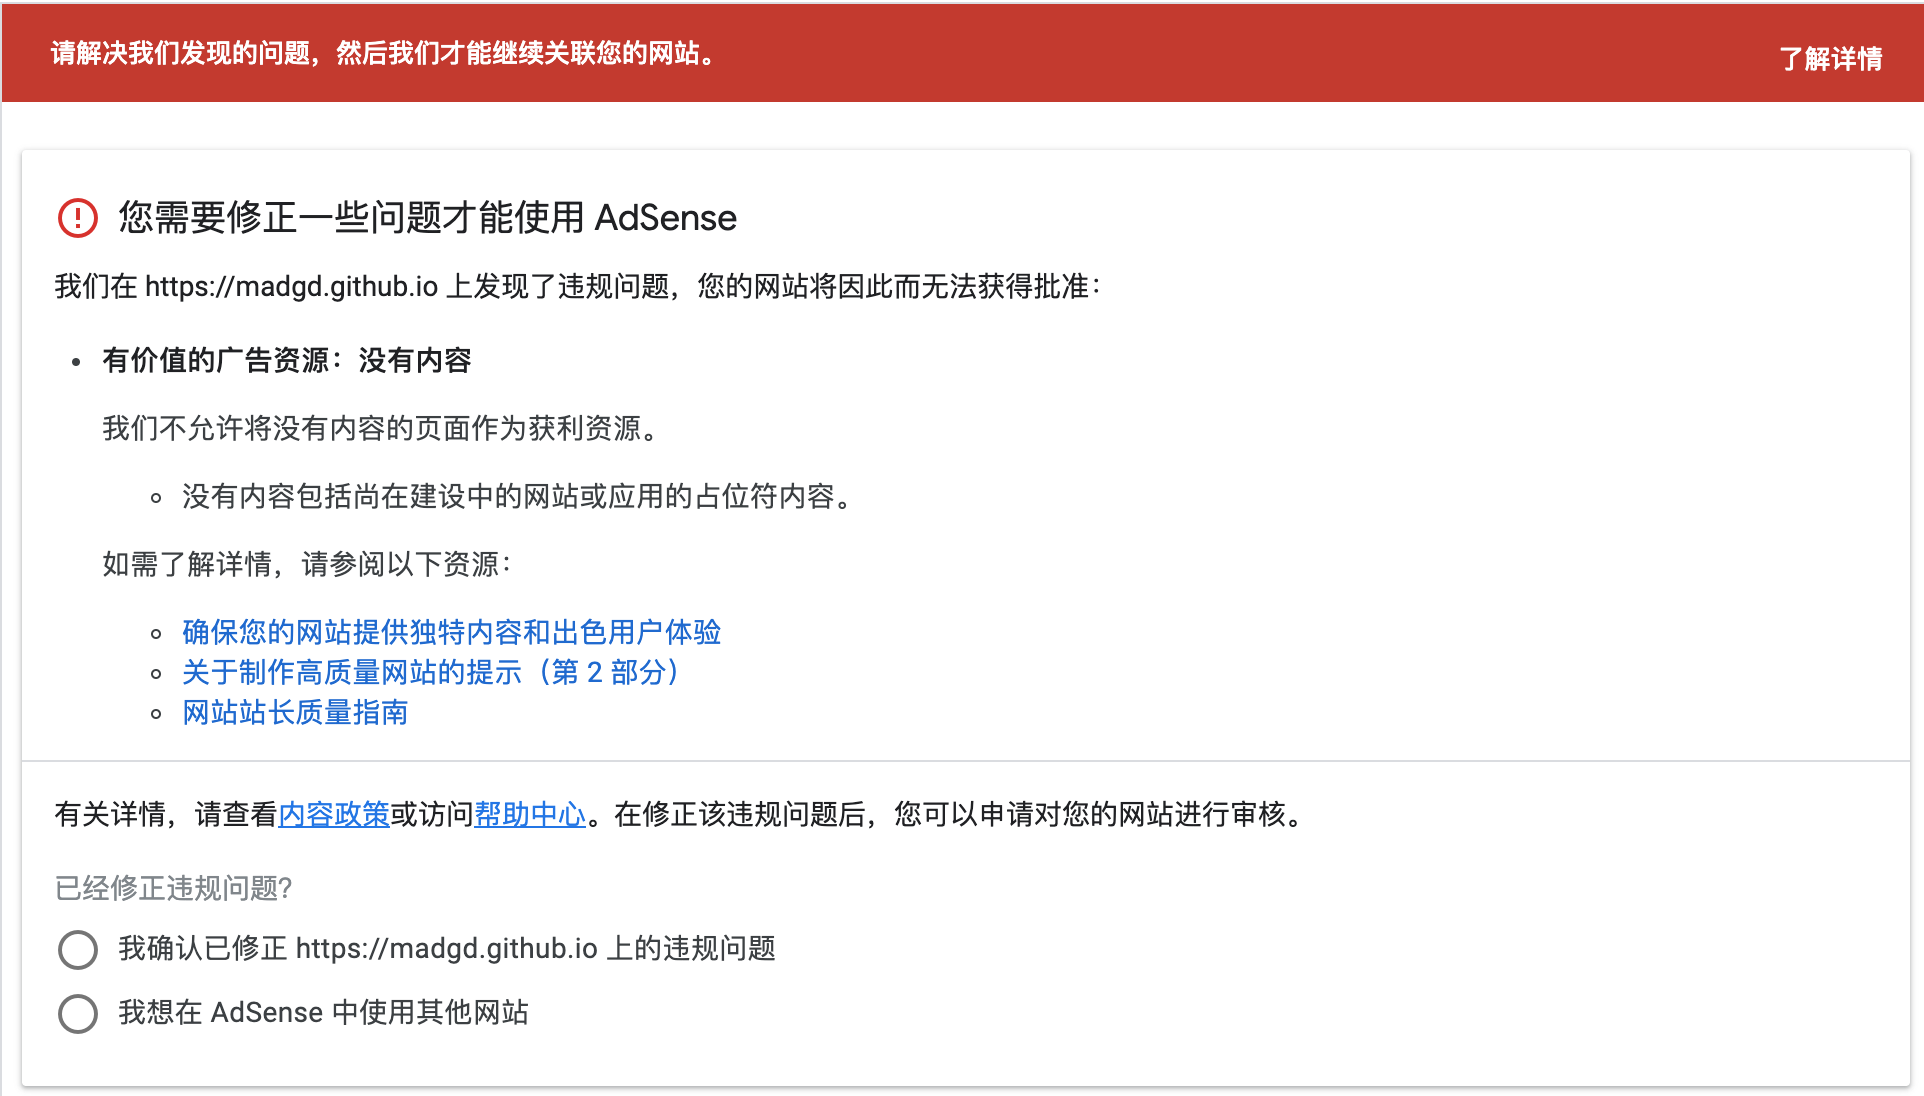
还是内容较少,原创度不足。等到后续积累起来之后再试吧。审核通过生效后,再来更新下面的内容。

